AWS
Lenses can be deployed in AWS with your own Apache Kafka or AWS MSK cluster with a CloudFormation template and it is available in AWS Marketplace. Based on Hardware & OS requirements for Lenses, we recommend to start with t2.large instances or any other instance type with >= 7GB.
The fields which you need to fill in the CloudFormation templates are the followings:
License for Lenses as JSON payload (Required)
Port which will be used to run Lenses. (Required)
Kafka Brokers as a comma-separated string (Required). For example:
PLAINTEXT://broker.1.url:9092,PLAINTEXT://broker.2.url:9092
Zookeeper as a one-line JSON payload (Optional). For example:
[{url:"zookeeper.1.url:2181", metrics:{url:"zookeeper.1.url:9585", type: "JMX"}},{url:"zookeeper.2.url:2181", metrics:{url:"zookeeper.2.url:9585", type:"JMX"}}]
Schema Registry as a one-line JSON payload (Optional). For example:
[{url:"http://schema.registry.1.url:8081", metrics:{url:"schema.registry.1.url:9582", type: "JMX"}},{url:"http://schema.registry.2.url:8081",metrics:{url:"schema.registry.2.url:9582", type: "JMX"}}]
Connect as a one-line JSON payload (Optional). For example:
[{name:"data_science",urls: [{url:"http://connect.worker.1.url:8083", metrics:{url:"connect.worker.1.url:9584", type: "JMX"}},{url:"http://connect.worker.2.url:8083",metrics:{url:"connect.worker.2.url:9584", type: "JMX"}}],statuses:"connect-statuses-cluster-a", configs:"connect-configs-cluster-a", offsets:"connect-offsets-cluster-a"}]
When deployment is done you can login to Lenses using the following credentials:
username: admin
password: <ec2-instance-ID>
Marketplace
- Archive
Lenses will be installed in the EC2 instance from the
.tar.gzLenses linux distribution and will expose inbound traffic only for the port which you provided during the template deployment.This template creates its own IAM profile and installs the AWS Log agent in EC2 instance. It is used to enable CloudWatch logging in order to be able to check all the available logs for the AWS Stack created for Lenses. More specifically the template enables these policies:
- logs:CreateLogGroup
- logs:CreateLogStream
- logs:PutLogEvents
- Docker
Lenses will be running in the EC2 instance as a docker container and will expose inbound traffic only for the port 80.
This template creates its own IAM profile which is attached in EC2 instance. It is used to enable CloudWatch logging in order to be able to check all the available logs for the AWS Stack created for Lenses. Apart from CloudWatch logging policies, it enables one more extra policy which is used to auto-discover Apache Kafka Brokers, Zookeeper and Workers based on AWS tagging.
Specifically, the template enables theses policies:
- logs:CreateLogGroup
- logs:CreateLogStream
- logs:PutLogEvents
- ec2:DescribeInstances
If you use the autodiscover feature you need to fill in the section Kafka (autodiscover) with the followings fields:
Field Description Type Default Required RegionThe region where your Apache Kafka cluster is located.string eu-west-1 yes BrokersThe tag name of your Apache Kafka Brokers EC2 instances.string broker yes ZookeeperThe tag name of your Zookeeper EC2 instances.string zookeeper yes WorkersThe tag name of your Connect and Schema Registry EC2 instances.string worker yes - Reference Architecture
Lenses will be installed in an EC2 instance which should be deployed into a private subnet.
The Lenses EC2 instance will not have direct internet access or a public IP address. Lenses outbound traffic must go out via a NAT gateway and recipients of requests from Lenses container will just see the request originating from the IP address of the NAT gateway. However, inbound traffic from the public can still reach Lenses EC2 instance because there is a public-facing load balancer that can proxy traffic from the public to Lenses container in the private subnet.
Be aware that the private subnet you will choose should be in the same Availability Zone with the selected LoadBalancer subnets. For example, if you selected for Load Balancer the public subnets in us-east-1a, us-east-1b then for Lenses you should select the private subnet which belongs in one of these two.
Use this template as a recommended reference architecture in AWS with EC2 instance to keep your data safe and secure and does not expose Lenses directly to the public Internet.
Also, it creates its own IAM profile which is attached in EC2 instance. It is used to enable CloudWatch logging in order to be able to check all the available logs for the AWS Stack created for Lenses. Apart from CloudWatch logging policies, it enables one more extra policy which is used to auto-discover Apache Kafka Brokers, Zookeeper and Workers based on AWS tagging.
Specifically the template enable theses policies:
- logs:CreateLogGroup
- logs:CreateLogStream
- logs:PutLogEvents
- ec2:DescribeInstances
Field Description Type Default Required RegionThe region where your Apache Kafka cluster is located.string eu-west-1 yes BrokersThe tag name of your Apache Kafka Brokers EC2 instances.string broker yes ZookeeperThe tag name of your Zookeeper EC2 instances.string zookeeper yes WorkersThe tag name of your Connect and Schema Registry EC2 instances.string worker yes
Deployment
- AWS MSK
You can deploy Lenses using AWS MSK with one of the marketplace templates. In order Lenses and AWS MSK be able to communicate you need manually to do the following:
MSK VPC Security Group
- Copy the Security Group ID of Lenses during CloudFormation deployment
- Open the Amazon VPC console
- In the navigation pane, choose Security Groups. In the table of security groups, find the security group which belongs to the VPC of the your deployed AWS MSK. Choose the group by selecting the check box in the first column.
- In the Inbound Rules tab, choose Edit rules and Choose Add Rule.
- In the new rule, choose All traffic in the Type column. In the second field in the Source column, enter the ID of the security group of Lenses which you copied at first step. Choose Save rules.
- Lenses Security Group
- Open the Amazon VPC console
- In the navigation pane, choose Security Groups. In the table of security groups, find the security group which belongs to the VPC of the deployed AWS MSK. Copy the Security Group ID.
- Choose the Lenses Security group by selecting the check box in the first column.
- In the Inbound Rules tab, choose Edit rules and Choose Add Rule.
- In the new rule, choose All traffic in the Type column. In the second field in the Source column, enter the ID of the security group of AWS MSK VPC which you copied at first step. Choose Save rules.
This enables Lenses EC2 instance to communicate back and forth with your MSK cluster as this is the recommended configuration for AWS MSK here.
- Common VPC
- You can deploy Lenses in the same VPC Apache Kafka infrastructure and you can use the provided IPs for Brokers, Zookeeper, Schema Registry and Connect.
- VPC-to-VPC Peering
- You can deploy Lenses in a different VPC by your Apache Kafka infrastructure and with peering the two different VPCs, Lenses can communicate with Brokers, Zookeeper, Schema Registry and Connect.
Service Discovery
Setup for brokers, zookeeper nodes, schema registries and one
connect distributed cluster without JMX and everything (ports, connect topics,
protocol) left at default values. Lenses VM should have the IAM permission
ec2:DescribeInstances. The Schema Registry runs in the same instances as
Connect. This example would actually work if you used Confluent’s AWS templates
to deploy your cluster.
SD_CONFIG=provider=aws region=eu-central-1 addr_type=public_v4
SD_BROKER_FILTER=tag_key=Name tag_value=*broker*
SD_ZOOKEEPER_FILTER=tag_key=Name tag_value=*zookeeper*
SD_REGISTRY_FILTER=tag_key=Name tag_value=*worker*
SD_CONNECT_FILTERS=tag_key=Name tag_value=*worker*
If you use our Docker or Reference Architecture CloudFormation there will be fields which you can fill for your specific named tags.
Kubernetes with Helm
- Nginx Controller
Lenses can be deployed with Nginx Ingress Controller in AWS with the following commands and additions in provided values for Lenses helm chart.
# Create Policy for IAM Role
curl https://raw.githubusercontent.com/kubernetes-sigs/aws-alb-ingress-controller/v1.0.0/docs/examples/iam-policy.json -O
aws iam create-policy --policy-name <YOUR-POLICY-NAME> --policy-document file://iam-policy.json
aws iam attach-user-policy --user-name <YOUR-USER-NAME> --policy-arn `CREATED-POLICY-ARN`

# Install NGINX Ingress controller
helm repo add incubator https://kubernetes-charts-incubator.storage.googleapis.com/
helm install stable/nginx-ingress --name <RELEASE-NAME>

# This will return the generated URL for Nginx Load Balancer
kubectl --namespace <THE-NAMESPACE-YOU-USED-TO-DEPLOY> get services -o wide -w <RELEASE-NAME>
When you run the above commands the NGINX ingress controller will be created.
restPort: 3030
servicePort: 3030

service:
  enabled: true
  type: ClusterIP
  annotations: {}

ingress:
  enabled: true
  host: <GENERATED-LB-NGINX-URL>

  annotations:
    kubernetes.io/ingress.class: nginx
- Traefik Controller
Lenses can be deployed with Traefik Ingress Controller in AWS with the following commands and additions in provided values for for Lenses helm chart.
# Create Policy for IAM Role
curl https://raw.githubusercontent.com/kubernetes-sigs/aws-alb-ingress-controller/v1.0.0/docs/examples/iam-policy.json -O
aws iam create-policy --policy-name <YOUR-POLICY-NAME> --policy-document file://iam-policy.json
aws iam attach-user-policy --user-name <YOUR-USER-NAME> --policy-arn `CREATED-POLICY-ARN`

# Install NGINX Ingress controller
helm repo add incubator https://kubernetes-charts-incubator.storage.googleapis.com/
helm install stable/traefik --name <RELEASE-NAME>

# Traefik's load balancer state
kubectl get svc <RELEASE-NAME>-traefik -w

# Once 'EXTERNAL-IP' is no longer '<pending>':
kubectl describe svc <RELEASE-NAME>-traefik | grep Ingress | awk '{print $3}'
restPort: 3030
servicePort: 3030

service:
  enabled: true
  type: ClusterIP
  annotations: {}

ingress:
  enabled: true
  host: <GENERATED-LB-TRAEFIK-URL>

  annotations:
    kubernetes.io/ingress.class: traefik
Note
- If you receive an error with the service account which you will use (eg. default) about the followings:
- Failed to list v1.Endpoints: endpoints is forbidden: User
- Failed to list v1.Service: services is forbidden: User
Then you need to bind your service account with role cluster-admin with the following RBAC YAML:
apiVersion: rbac.authorization.k8s.io/v1beta1
kind: ClusterRoleBinding
metadata:
  name: fabric8-rbac
subjects:
  - kind: ServiceAccount
    name: <NAME-OF-YOUR-SERVICE-ACCOUNT>
    namespace: <NAME-OF-YOUR-NAMESPACE>
roleRef:
  kind: ClusterRole
  name: cluster-admin
  apiGroup: rbac.authorization.k8s.io
- Application Load Balancer
Lenses can be deployed with AWS Application Load Balaner with the following commands and additions in provided values for Lenses helm chart. First you need to attach the following IAM Policies to the EKS Node Instance IAM Role you will use to deploy ALB ingress controller.
# Create Policy for IAM Role
curl https://raw.githubusercontent.com/kubernetes-sigs/aws-alb-ingress-controller/v1.0.0/docs/examples/iam-policy.json -O
aws iam create-policy --policy-name <YOUR-POLICY-NAME> --policy-document file://iam-policy.json
aws iam attach-user-policy --user-name <YOUR-USER-NAME> --policy-arn `CREATED-POLICY-ARN`

# Install ALB Ingress controller
helm repo add incubator http://storage.googleapis.com/kubernetes-charts-incubator
helm install incubator/aws-alb-ingress-controller --set clusterName=<EKS-CLUSTER-NAME> --set awsRegion=<YOUR-REGION> --set awsVpcID=<YOUR-VPC-ID> --name <RELEASE-NAME>
When you run the above commands the ALB ingress controller will not be created till you deploy Lenses which includes an ingress configuration for alb. In Lenses values you need add the following options:
restPort: 3030
servicePort: 3030

service:
  enabled: true
  type: ClusterIP
  annotations: {}

ingress:
  enabled: true
  host:

  annotations:
    kubernetes.io/ingress.class: alb
    alb.ingress.kubernetes.io/subnets: <SUBNETS-VPC-OF-DEPLOYED-ALB>
    alb.ingress.kubernetes.io/scheme: internet-facing
    alb.ingress.kubernetes.io/target-type: ip
Then check the Load balancer DNS FQDN with:
kubectl get ingress -o wide -w
If you specify a host for ingress, you need to add ALB address to Route53 to be able to access it externally. Or, deploy external DNS to manage Route53 records automatically, which is also recommended.
ECS Fargate
Lenses will be installed in Elastic Container Service (ECS) with AWS Fargate compute engine that allows you to run containers without having to manage servers or clusters.

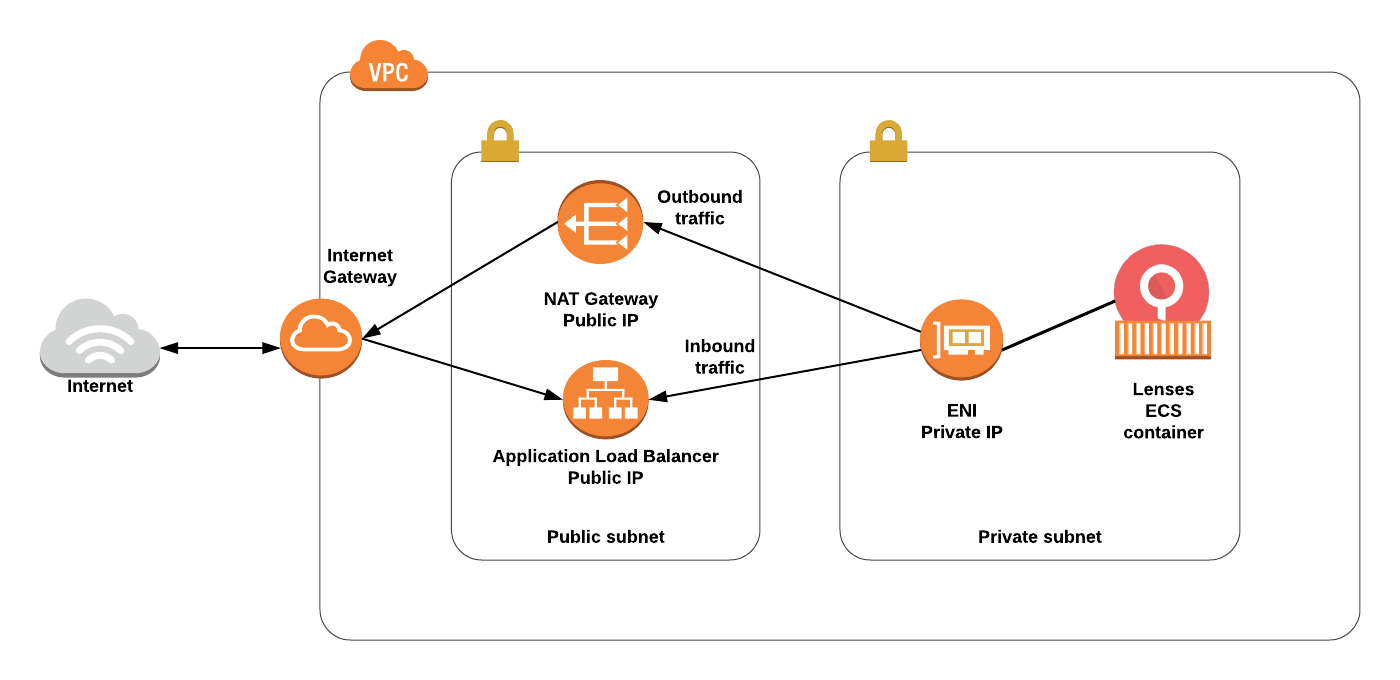 Lenses AWS ECS reference architecture