AWS
Lenses can be installed on a EC2 instance against a MSK cluster with a Cloud Formation tempate (recommended). The template will configure the brokers for you. Alternatively you can install Lenses as an EC2 instance without MSK and then configure Lenses as a standard Linux Archive.
Lenses is also available as an AMI.
MSK Prerequisites
- AWS subscription
- MSK cluster with with Open Monitoring enabled.
Follow the instructions the MSK and
enable Open Monitoring during the cluster creation.
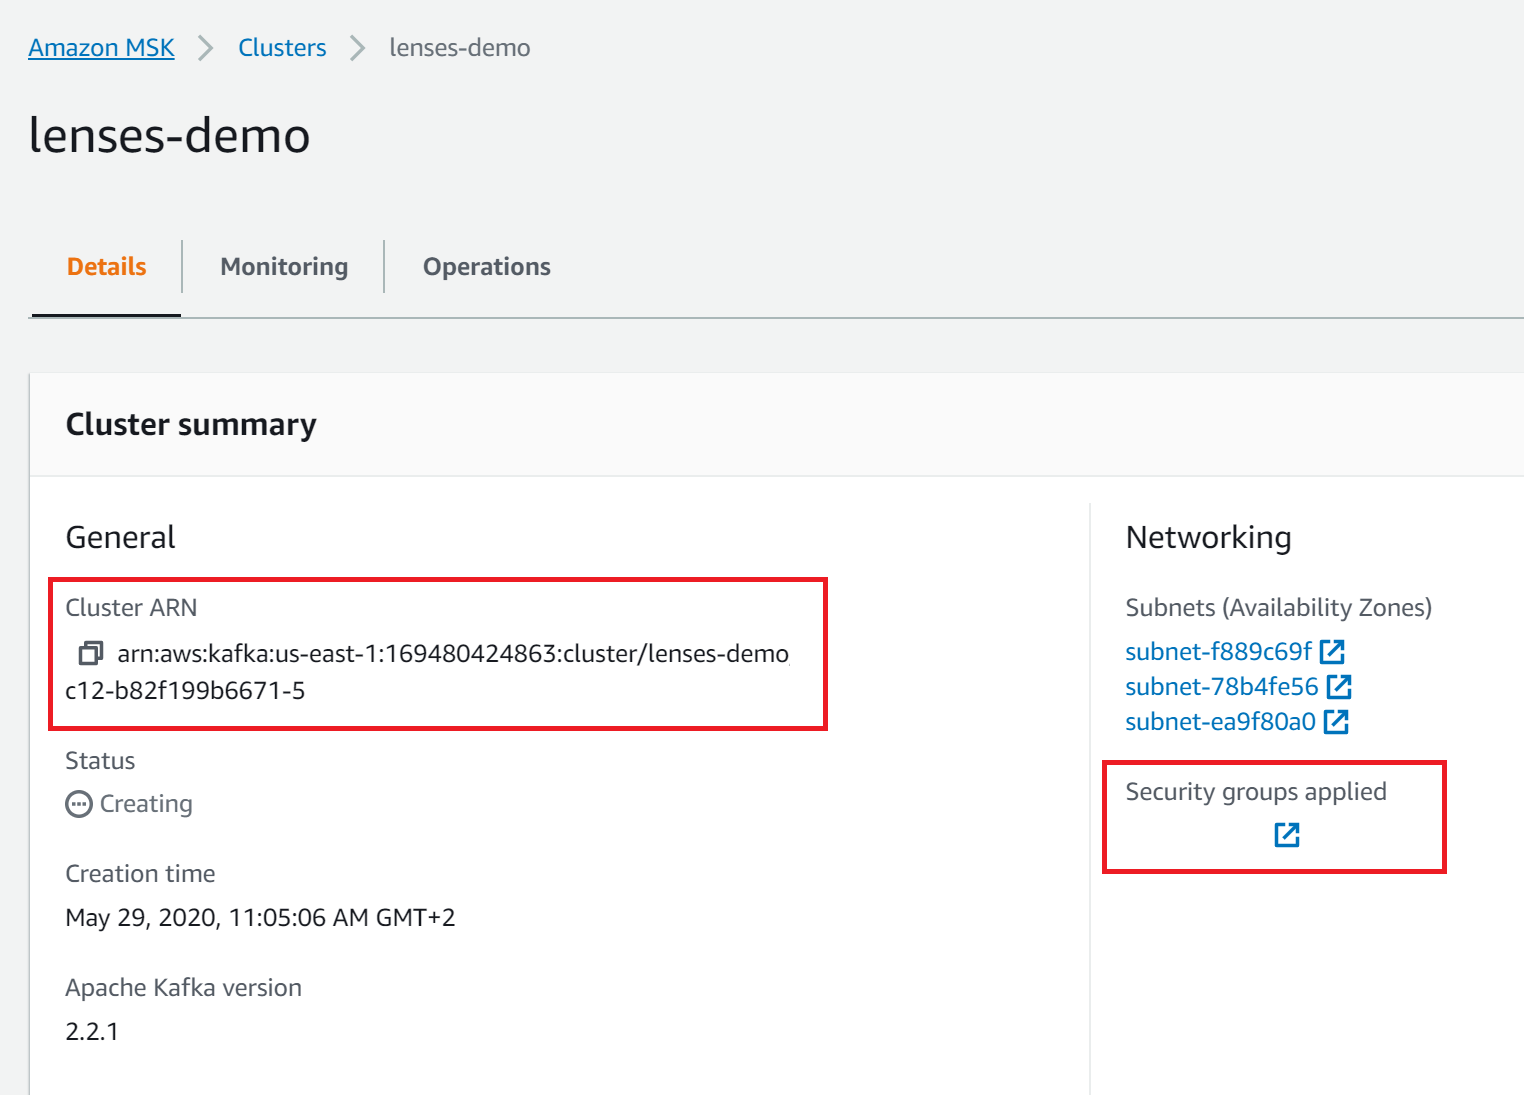
Once your cluster is deployed, note down the Cluster ARN and Security group:
Installing
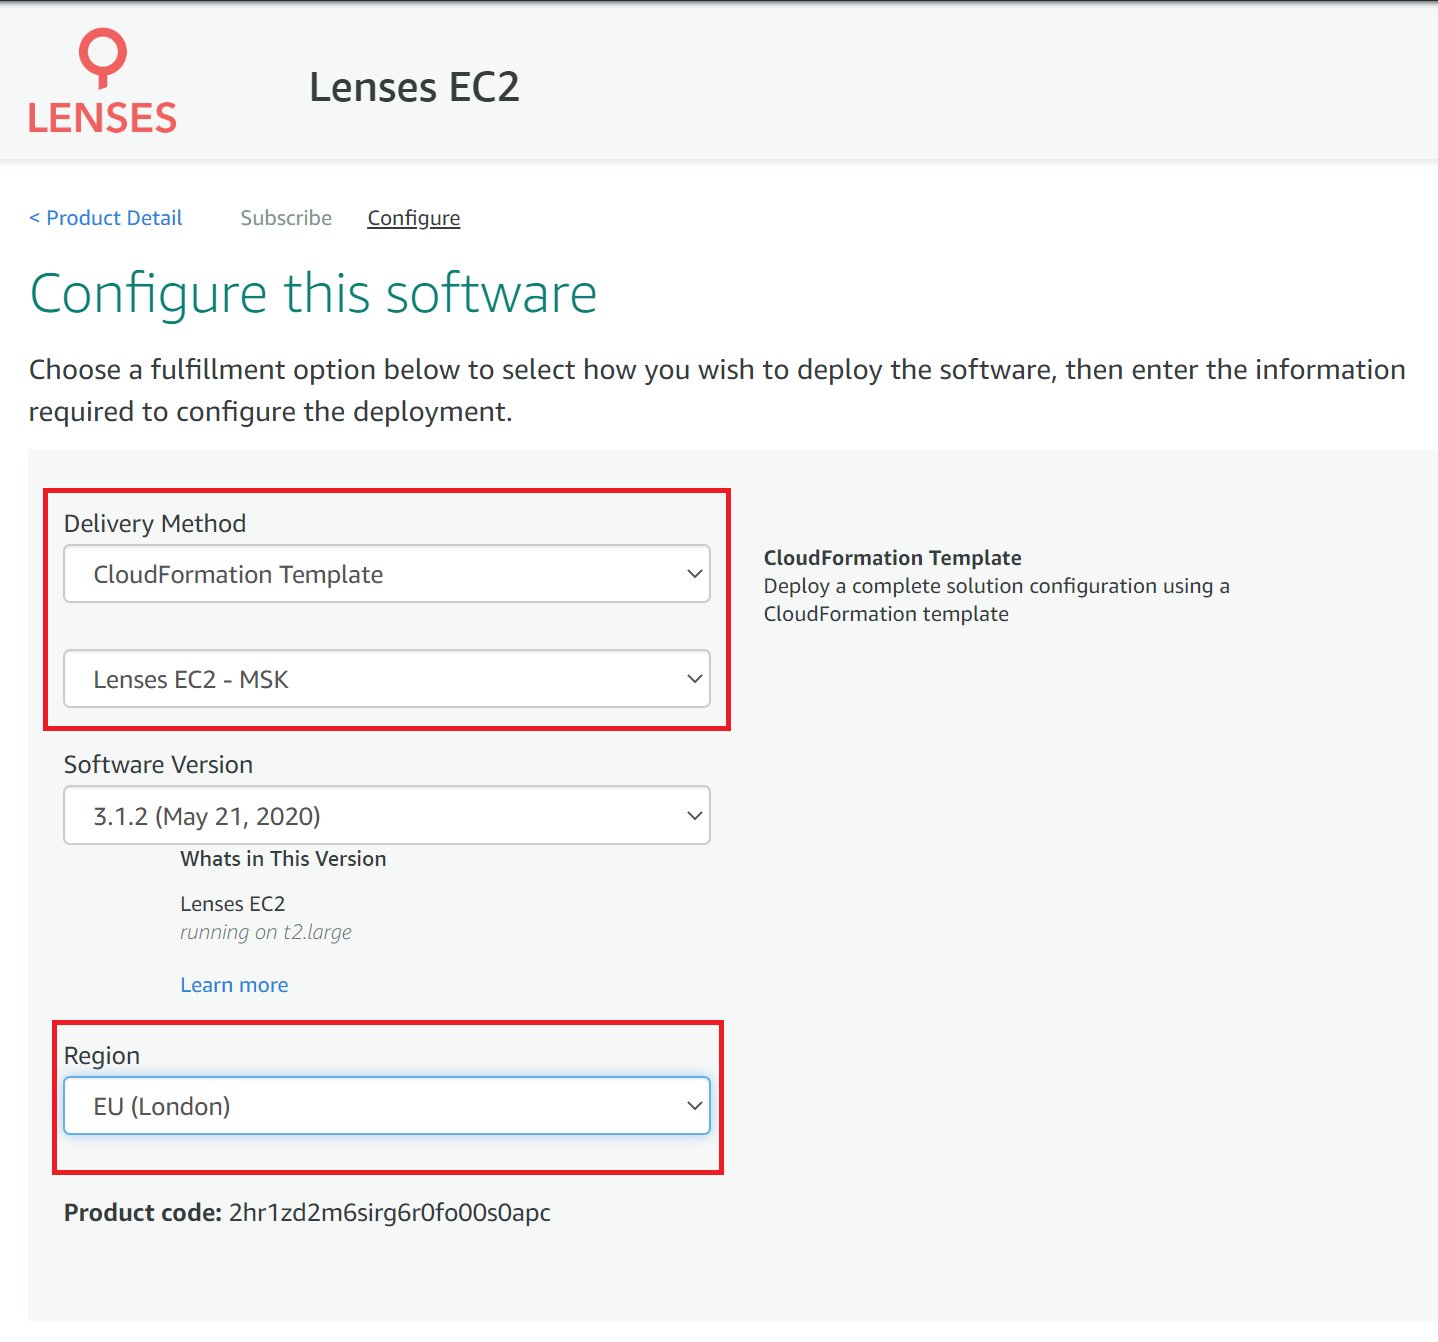
1. Go to the AWS marketplace
Select the CloudFormation Template and Lenses - EC2 MSK as
the delivery method.
If you don’t have MSK select Lenses - EC2 for a standard linux install but MSK is recommended.
2. Choose Launch CloudFormation as the action

Warning
Make sure you select the same region as your MSK cluster
3. Continue with the default options for creating the stack in the AWS wizard
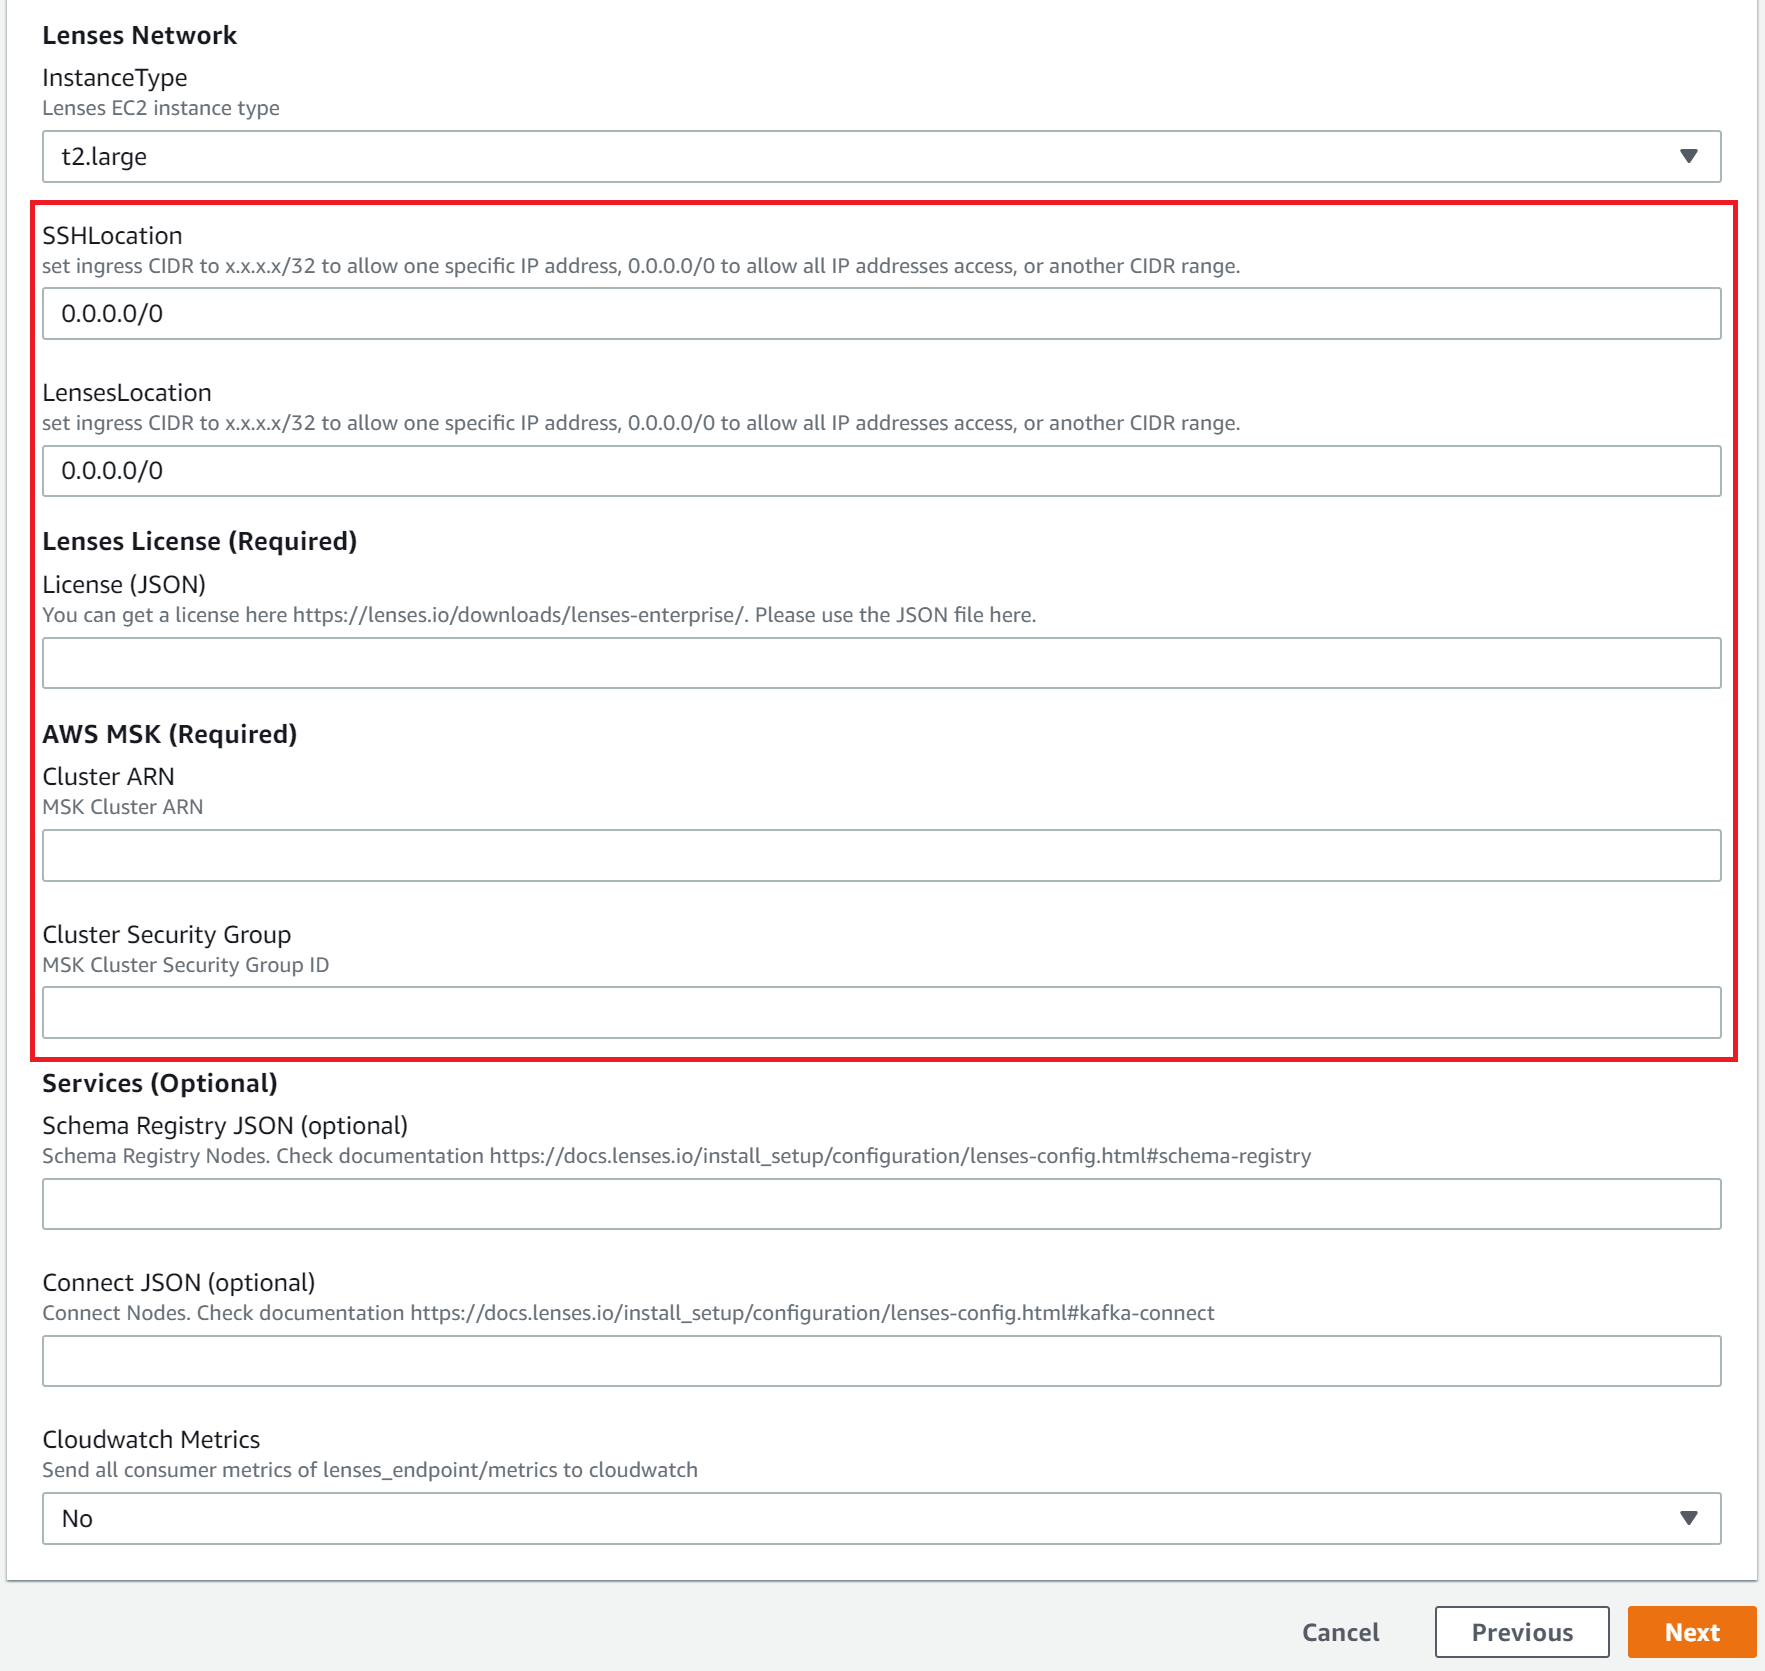
At the Specify stack details, enter the following:
- Name for your Lenses deployment at the top
- Lenses instanceType - Recommended
t2.large - SSHLocation -
0.0.0.0/0
Apply a CIDR range according to your security policies to connect to the Lenses instance over SSH. Note: EC2 Instance Connect is used to SSH to the machine
- LensesLocation -
0.0.0.0/0
Apply a CIDR range according to your security policies to connect to Lenses UI and API via port 9991
- Lenses license - the full JSON license file recieved by email
- AWS MSK ARN - From AWS MSK Console
- AWS Cluster Security Group - From AWS MSK Console
- Enable CloudWatch metrics.
Tip
Ensure you set the subnets
Optionaly set:
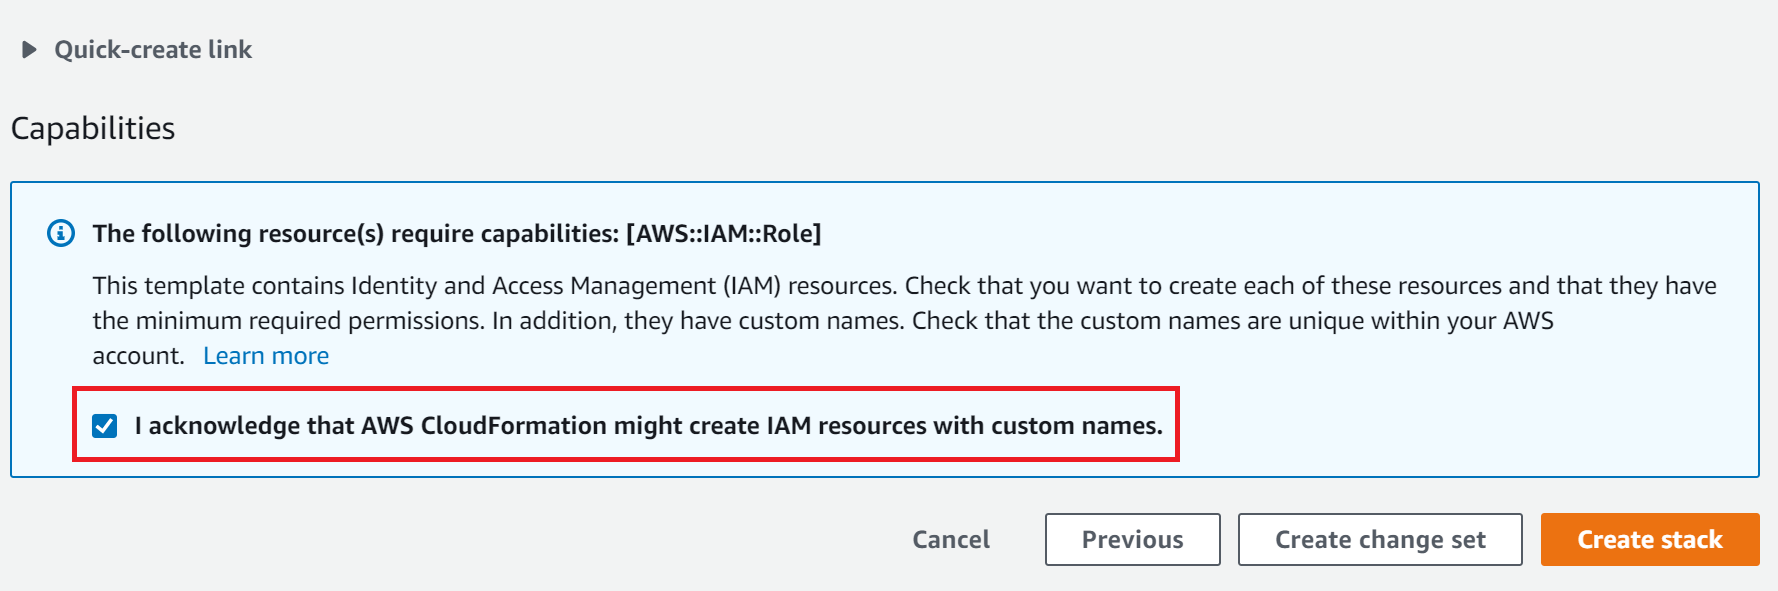
4. Review the stack
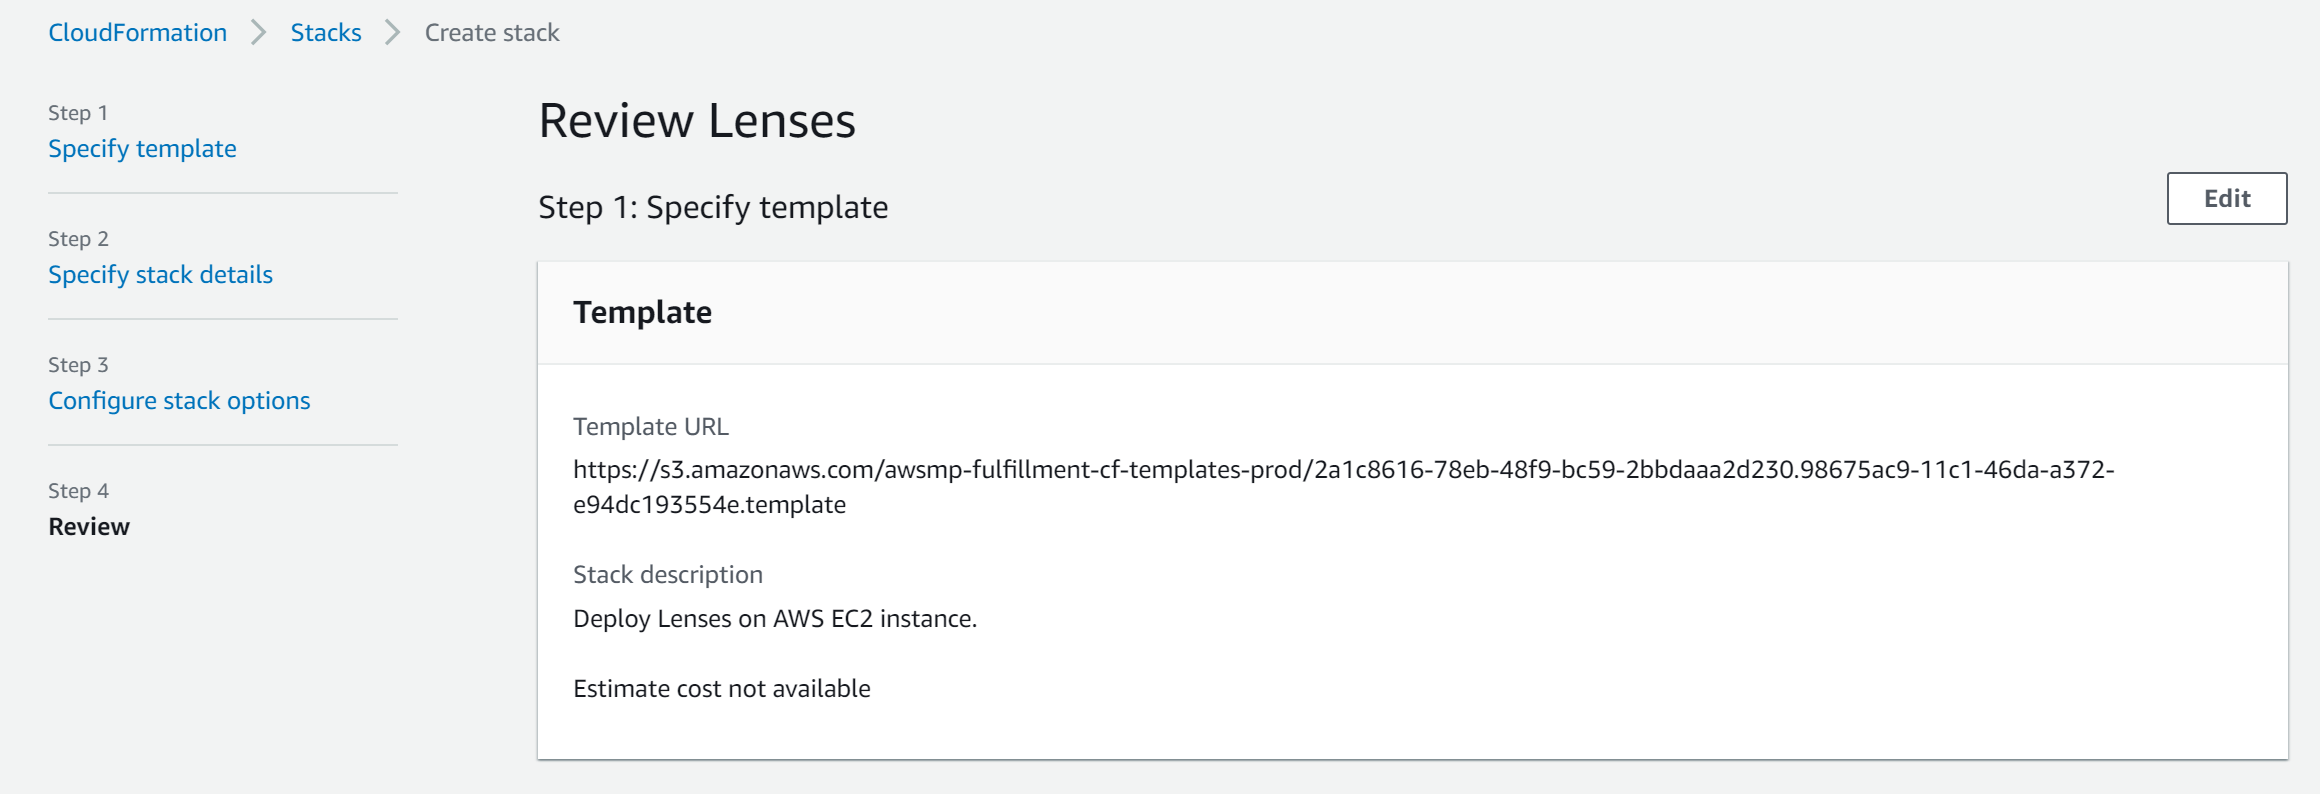
5. Accept the terms and conditions and create the stack
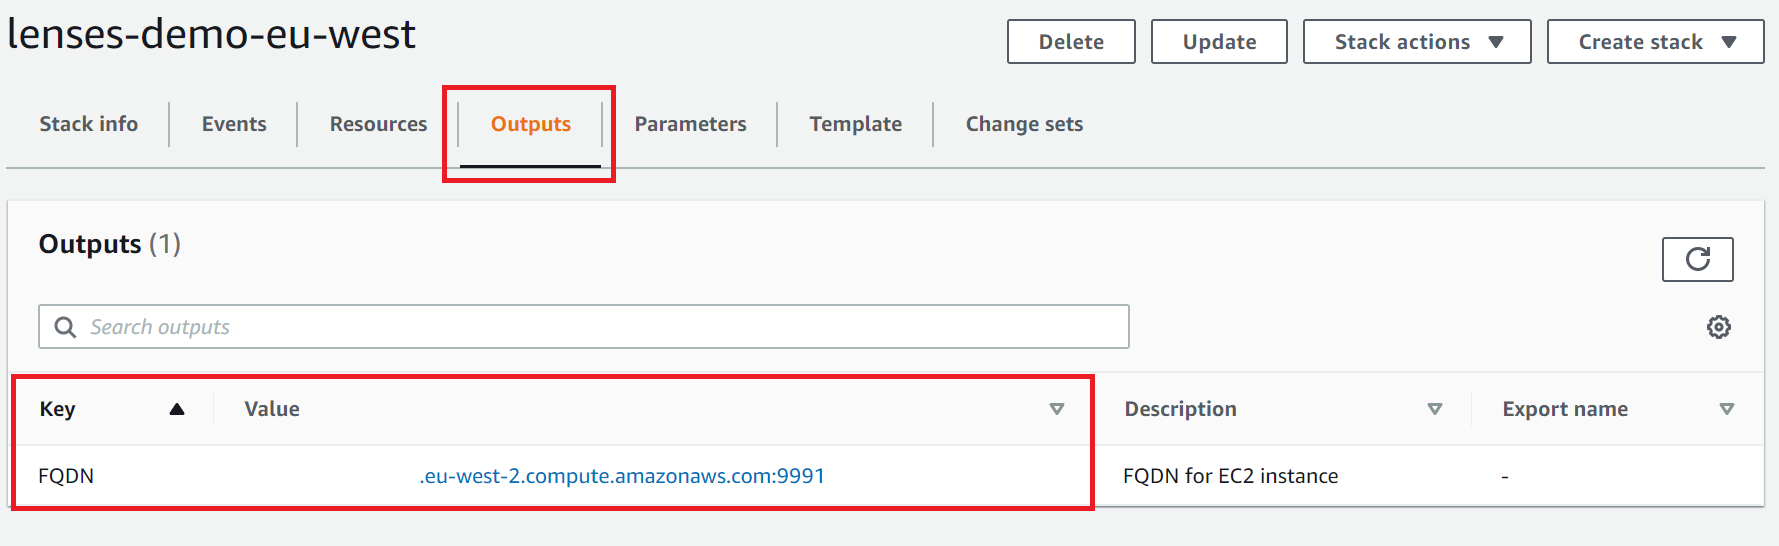
6. Once the stack has deployed, go to the Output tab and click on the FQDN link
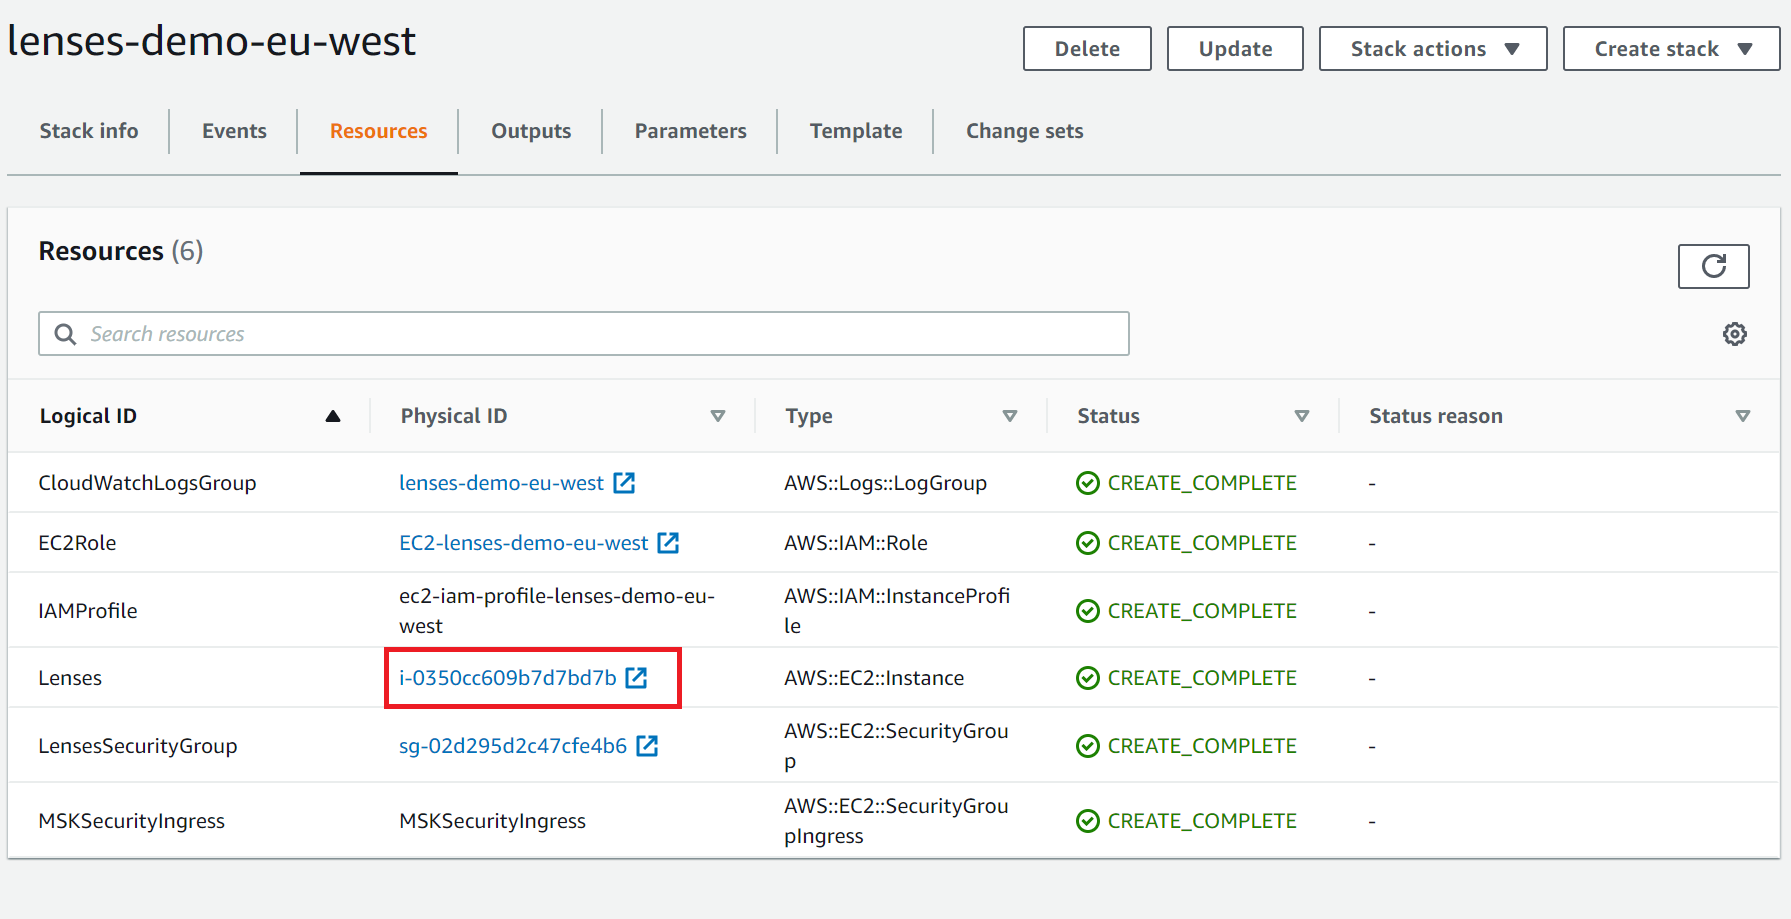
Login to Lenses with admin/ec-instance-name.
You can find the instance name in the resources tab of the Cloud Formation stack.
Template Polices
The template enables the following policies:
- logs:CreateLogGroup
- logs:CreateLogStream
- logs:PutLogEvents
- kafka:Describe*
- kafka:List*
- logs:PutLogEvents
- acm-pca:IssueCertificate
- acm-pca:GetCertificate
Template options
Required fields
| Field | Description | Type | Required |
|---|---|---|---|
Lenses License |
The Lenses license | string | yes |
BrokerURLs |
The connection string for Kafka brokers
eg. PLAINTEXT://broker.1.url:9092,PLAINTEXT://broker.2.url:9092.
|
string | yes |
Optional fields
| Field | Description | Type | Required |
|---|---|---|---|
ZookeeperURLs |
A list of all the zookeeper nodes | array | no |
SchemaRegistryURLs |
A list of Schema Registry nodes | array | no |
ConnectURLs |
A list of all the Kafka Connect clusters | array | **no* |
Service Discovery
Setup for brokers, zookeeper nodes, schema registries and one
connect distributed cluster without JMX and everything (ports, connect topics,
protocol) left at default values. Lenses VM should have the IAM permission
ec2:DescribeInstances. The Schema Registry runs in the same instances as
Connect. This example would work if you used Confluent’s AWS templates
to deploy your cluster.
SD_CONFIG=provider=aws region=eu-central-1 addr_type=public_v4
SD_BROKER_FILTER=tag_key=Name tag_value=*broker*
SD_ZOOKEEPER_FILTER=tag_key=Name tag_value=*zookeeper*
SD_REGISTRY_FILTER=tag_key=Name tag_value=*worker*
SD_CONNECT_FILTERS=tag_key=Name tag_value=*worker*
If you use our Docker or Reference Architecture CloudFormation there will be fields which you can fill for your specific named tags.
<<<<<<< HEAD <<<<<<< HEAD
Note: If you have any issue contact or chat with us
>>>>>>> improve cloud
Kubernetes with Helm
- Nginx Controller
Lenses can be deployed with Nginx Ingress Controller in AWS with the following commands and additions in provided values for Lenses helm chart.
# Create Policy for IAM Role
curl https://raw.githubusercontent.com/kubernetes-sigs/aws-alb-ingress-controller/v1.0.0/docs/examples/iam-policy.json -O
aws iam create-policy --policy-name <YOUR-POLICY-NAME> --policy-document file://iam-policy.json
aws iam attach-user-policy --user-name <YOUR-USER-NAME> --policy-arn `CREATED-POLICY-ARN`

# Install NGINX Ingress controller
helm repo add incubator https://kubernetes-charts-incubator.storage.googleapis.com/
helm install stable/nginx-ingress --name <RELEASE-NAME>

# This will return the generated URL for Nginx Load Balancer
kubectl --namespace <THE-NAMESPACE-YOU-USED-TO-DEPLOY> get services -o wide -w <RELEASE-NAME>
When you run the above commands the NGINX ingress controller will be created.
restPort: 3030
servicePort: 3030

service:
  enabled: true
  type: ClusterIP
  annotations: {}

ingress:
  enabled: true
  host: <GENERATED-LB-NGINX-URL>

  annotations:
    kubernetes.io/ingress.class: nginx
- Traefik Controller
Lenses can be deployed with Traefik Ingress Controller in AWS with the following commands and additions in provided values for Lenses helm chart.
# Create Policy for IAM Role
curl https://raw.githubusercontent.com/kubernetes-sigs/aws-alb-ingress-controller/v1.0.0/docs/examples/iam-policy.json -O
aws iam create-policy --policy-name <YOUR-POLICY-NAME> --policy-document file://iam-policy.json
aws iam attach-user-policy --user-name <YOUR-USER-NAME> --policy-arn `CREATED-POLICY-ARN`

# Install NGINX Ingress controller
helm repo add incubator https://kubernetes-charts-incubator.storage.googleapis.com/
helm install stable/traefik --name <RELEASE-NAME>

# Traefik's load balancer state
kubectl get svc <RELEASE-NAME>-traefik -w

# Once 'EXTERNAL-IP' is no longer '<pending>':
kubectl describe svc <RELEASE-NAME>-traefik | grep Ingress | awk '{print $3}'
restPort: 3030
servicePort: 3030

service:
  enabled: true
  type: ClusterIP
  annotations: {}

ingress:
  enabled: true
  host: <GENERATED-LB-TRAEFIK-URL>

  annotations:
    kubernetes.io/ingress.class: traefik
Note
- If you receive an error with the service account which you will use (eg. default) about the followings:
- Failed to list v1.Endpoints: endpoints is forbidden: User
- Failed to list v1.Service: services is forbidden: User
Then you need to bind your service account with role cluster-admin with the following RBAC YAML:
apiVersion: v1
kind: ServiceAccount
metadata:
  name: tiller
  namespace: kube-system
---
apiVersion: rbac.authorization.k8s.io/v1beta1
kind: ClusterRoleBinding
metadata:
  name: tiller
roleRef:
  apiGroup: rbac.authorization.k8s.io
  kind: ClusterRole
  name: cluster-admin
subjects:
  - kind: ServiceAccount
    name: tiller
    namespace: kube-system
- Application Load Balancer
Lenses can be deployed with AWS Application Load Balancer with the following commands and additions in provided values for Lenses helm chart. First, you need to attach the following IAM Policies to the EKS Node Instance IAM Role you will use to deploy ALB ingress controller.
# Create Policy for IAM Role
curl https://raw.githubusercontent.com/kubernetes-sigs/aws-alb-ingress-controller/v1.0.0/docs/examples/iam-policy.json -O
aws iam create-policy --policy-name <YOUR-POLICY-NAME> --policy-document file://iam-policy.json
aws iam attach-user-policy --user-name <YOUR-USER-NAME> --policy-arn `CREATED-POLICY-ARN`

# Install ALB Ingress controller
helm repo add incubator http://storage.googleapis.com/kubernetes-charts-incubator
helm install incubator/aws-alb-ingress-controller --set clusterName=<EKS-CLUSTER-NAME> --set awsRegion=<YOUR-REGION> --set awsVpcID=<YOUR-VPC-ID> --name <RELEASE-NAME>
When you run the above commands the ALB ingress controller will not be created till you deploy Lenses which includes an ingress configuration for ALB. You need to add the following options:
restPort: 3030
servicePort: 3030

service:
  enabled: true
  type: ClusterIP
  annotations: {}

ingress:
  enabled: true
  host:

  annotations:
    kubernetes.io/ingress.class: alb
    alb.ingress.kubernetes.io/subnets: <SUBNETS-VPC-OF-DEPLOYED-ALB>
    alb.ingress.kubernetes.io/scheme: internet-facing
    alb.ingress.kubernetes.io/target-type: ip
Then check the Load balancer DNS FQDN with:
kubectl get ingress -o wide -w
If you specify a host for ingress, you need to add ALB address to Route53 to be able to access it externally. Or, deploy external DNS to manage Route53 records automatically, which is also recommended.