> For the complete documentation index, see [llms.txt](https://docs.lenses.io/latest/llms.txt). Markdown versions of documentation pages are available by appending `.md` to page URLs; this page is available as [Markdown](https://docs.lenses.io/latest/vs-code-extension/features.md).
# Features
Understand the capabilities of the Lenses VS Code Extension for Kafka.
Use the extension to explore environments, manage Kafka resources, run SQL, and monitor health without leaving VS Code.
Start with [Install](/latest/vs-code-extension/install.md), then follow [Quick Start](/latest/vs-code-extension/quick-start.md). For language model tooling and command references, see [Overview](/latest/vs-code-extension/overview.md).
### Environments
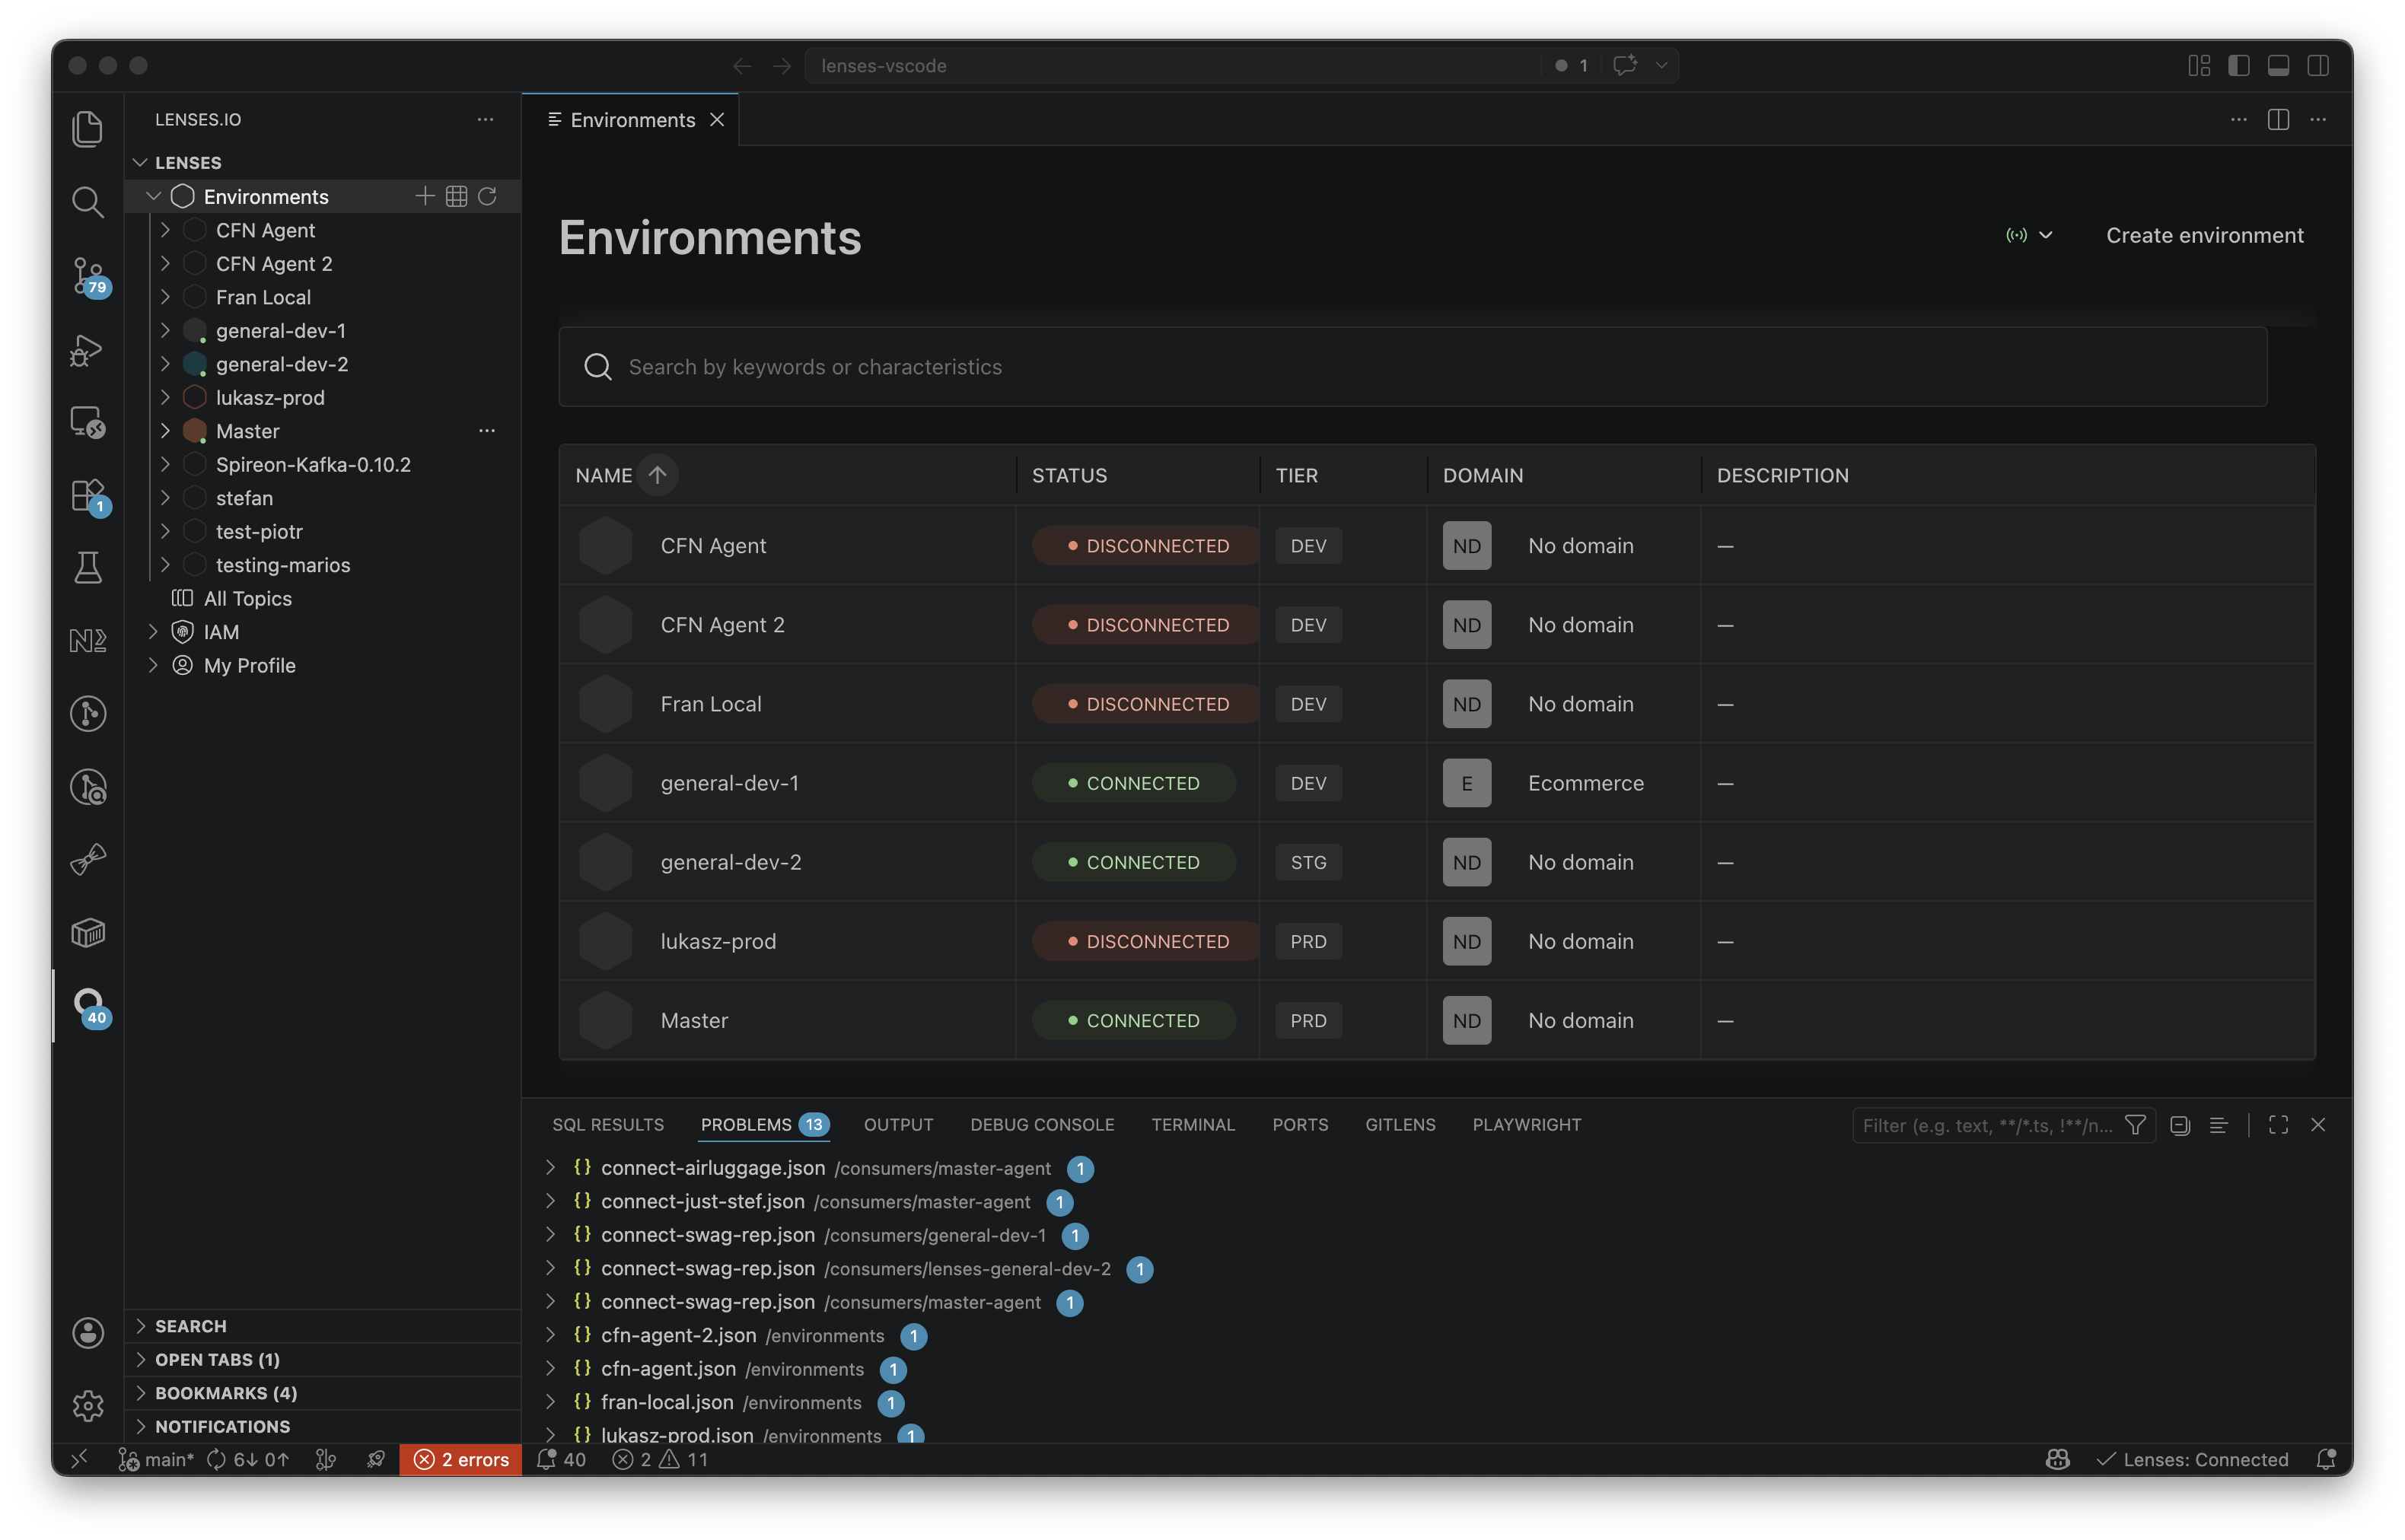
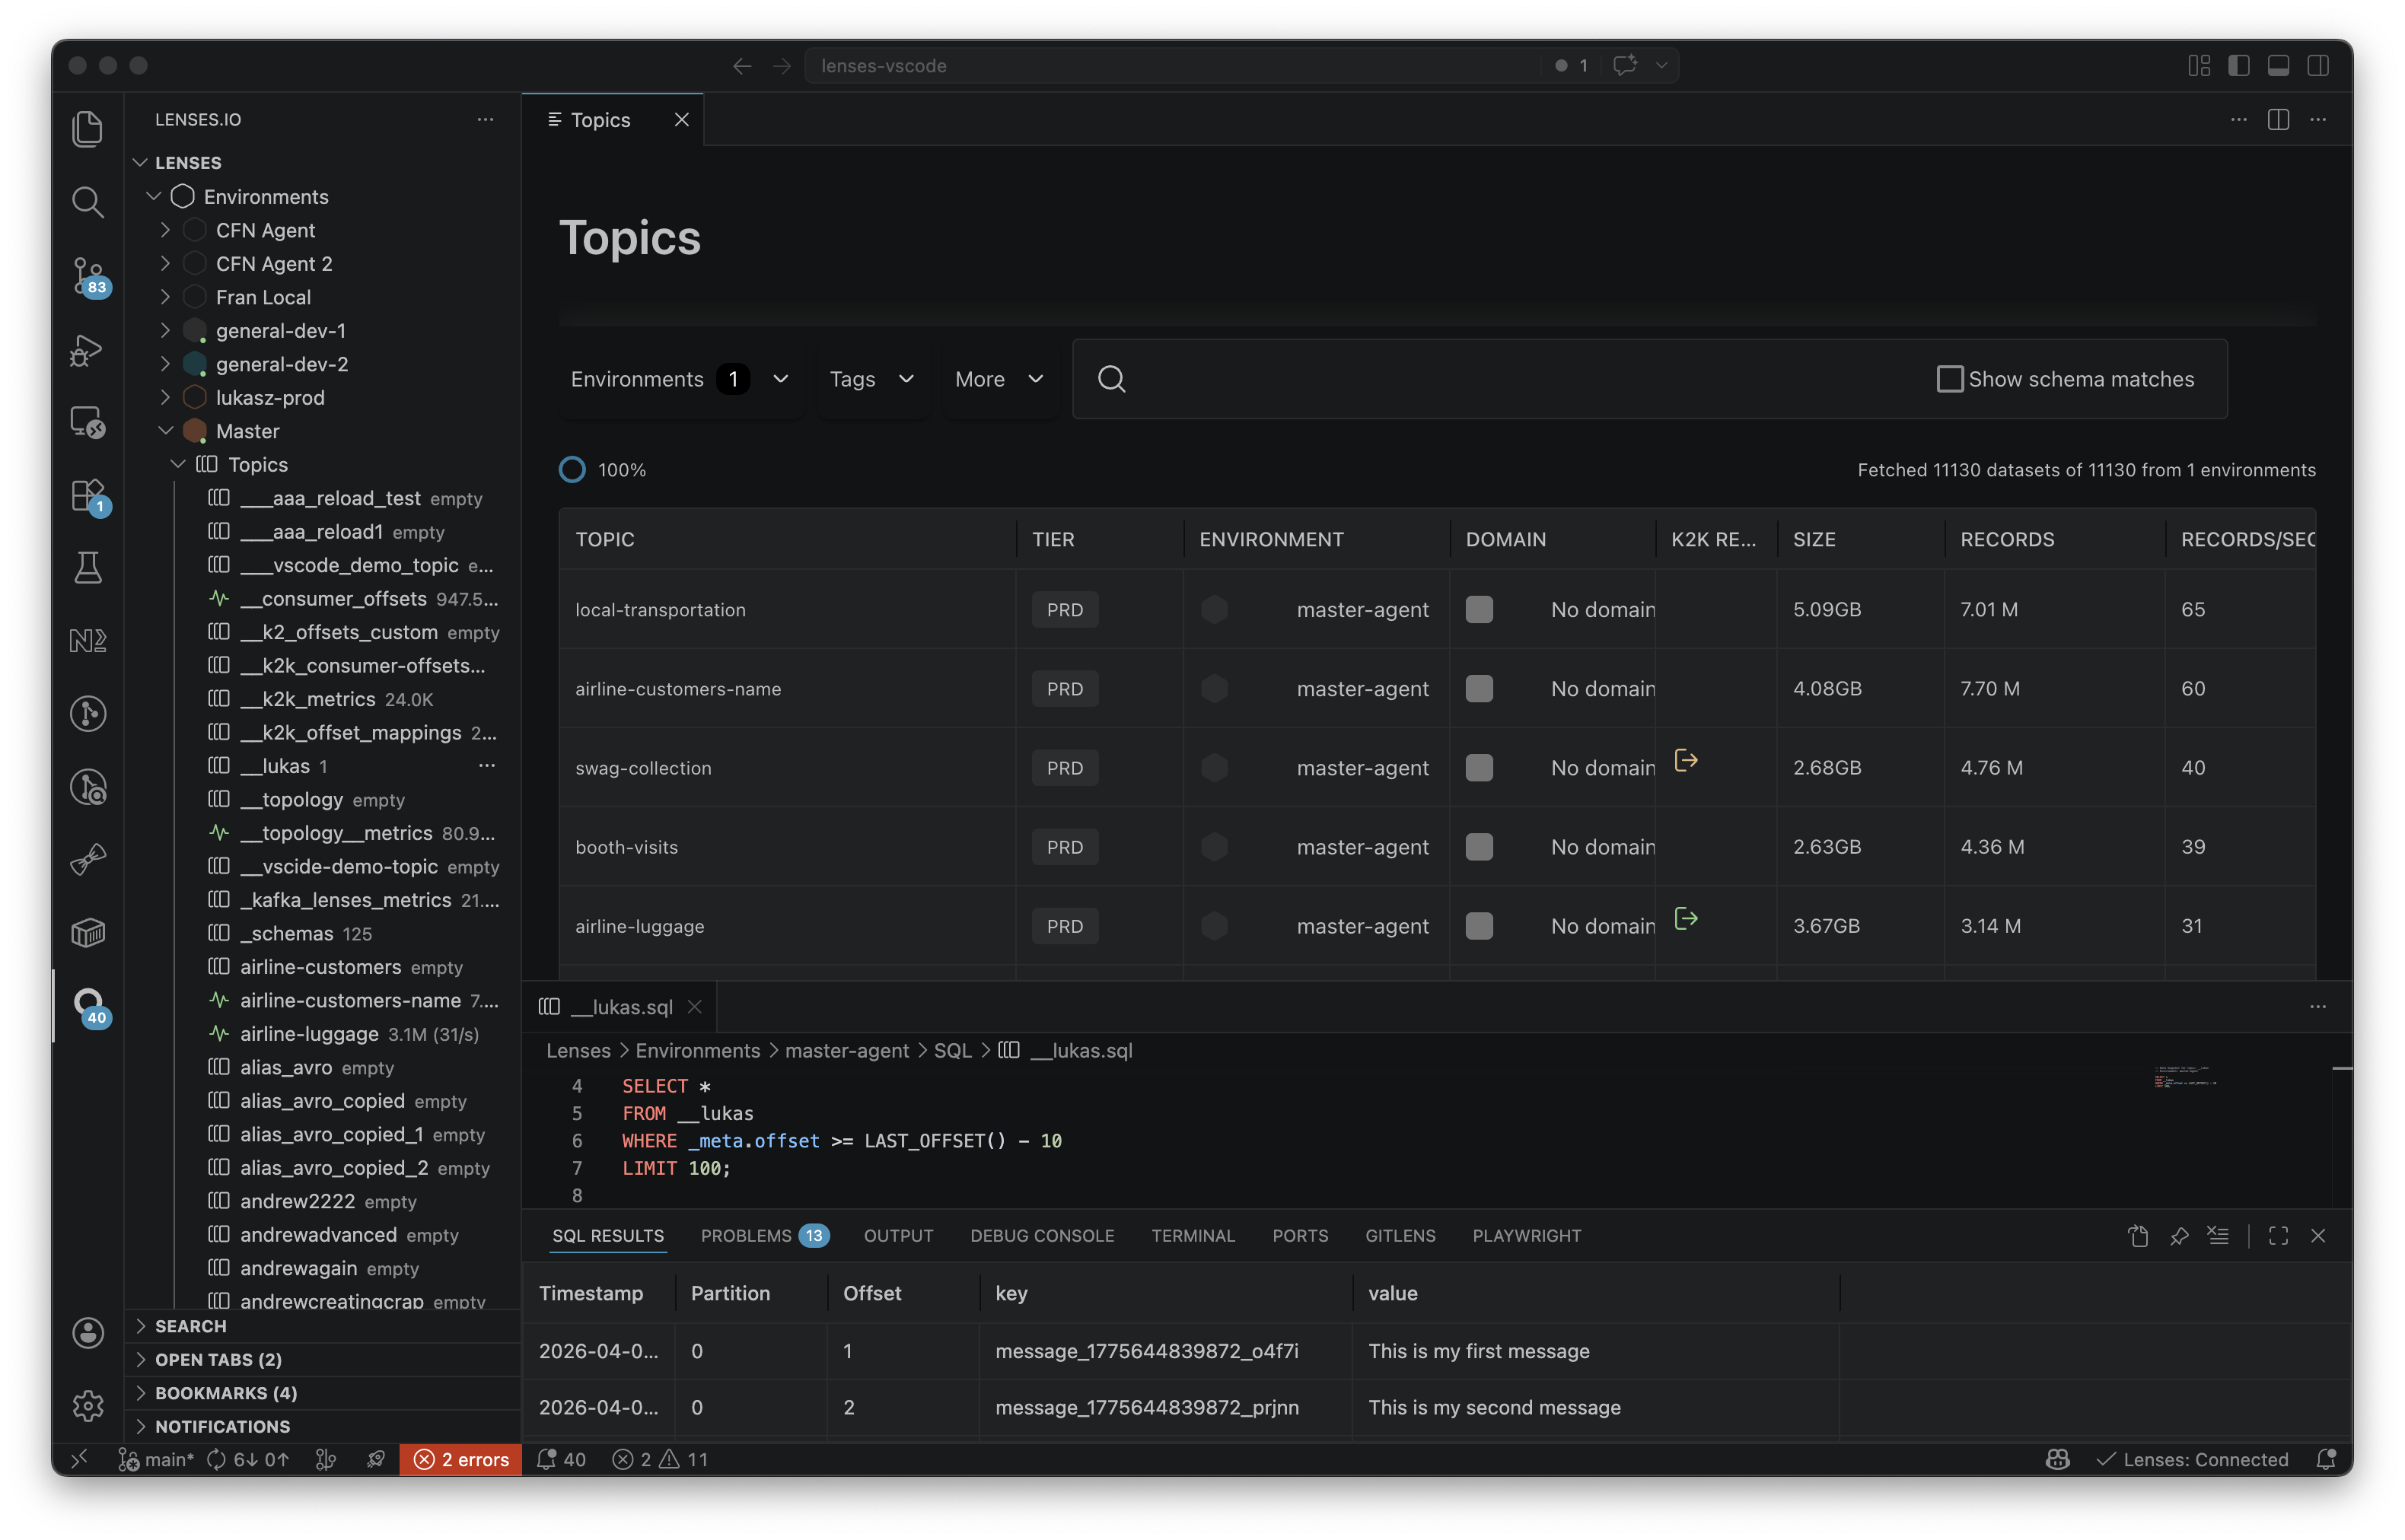
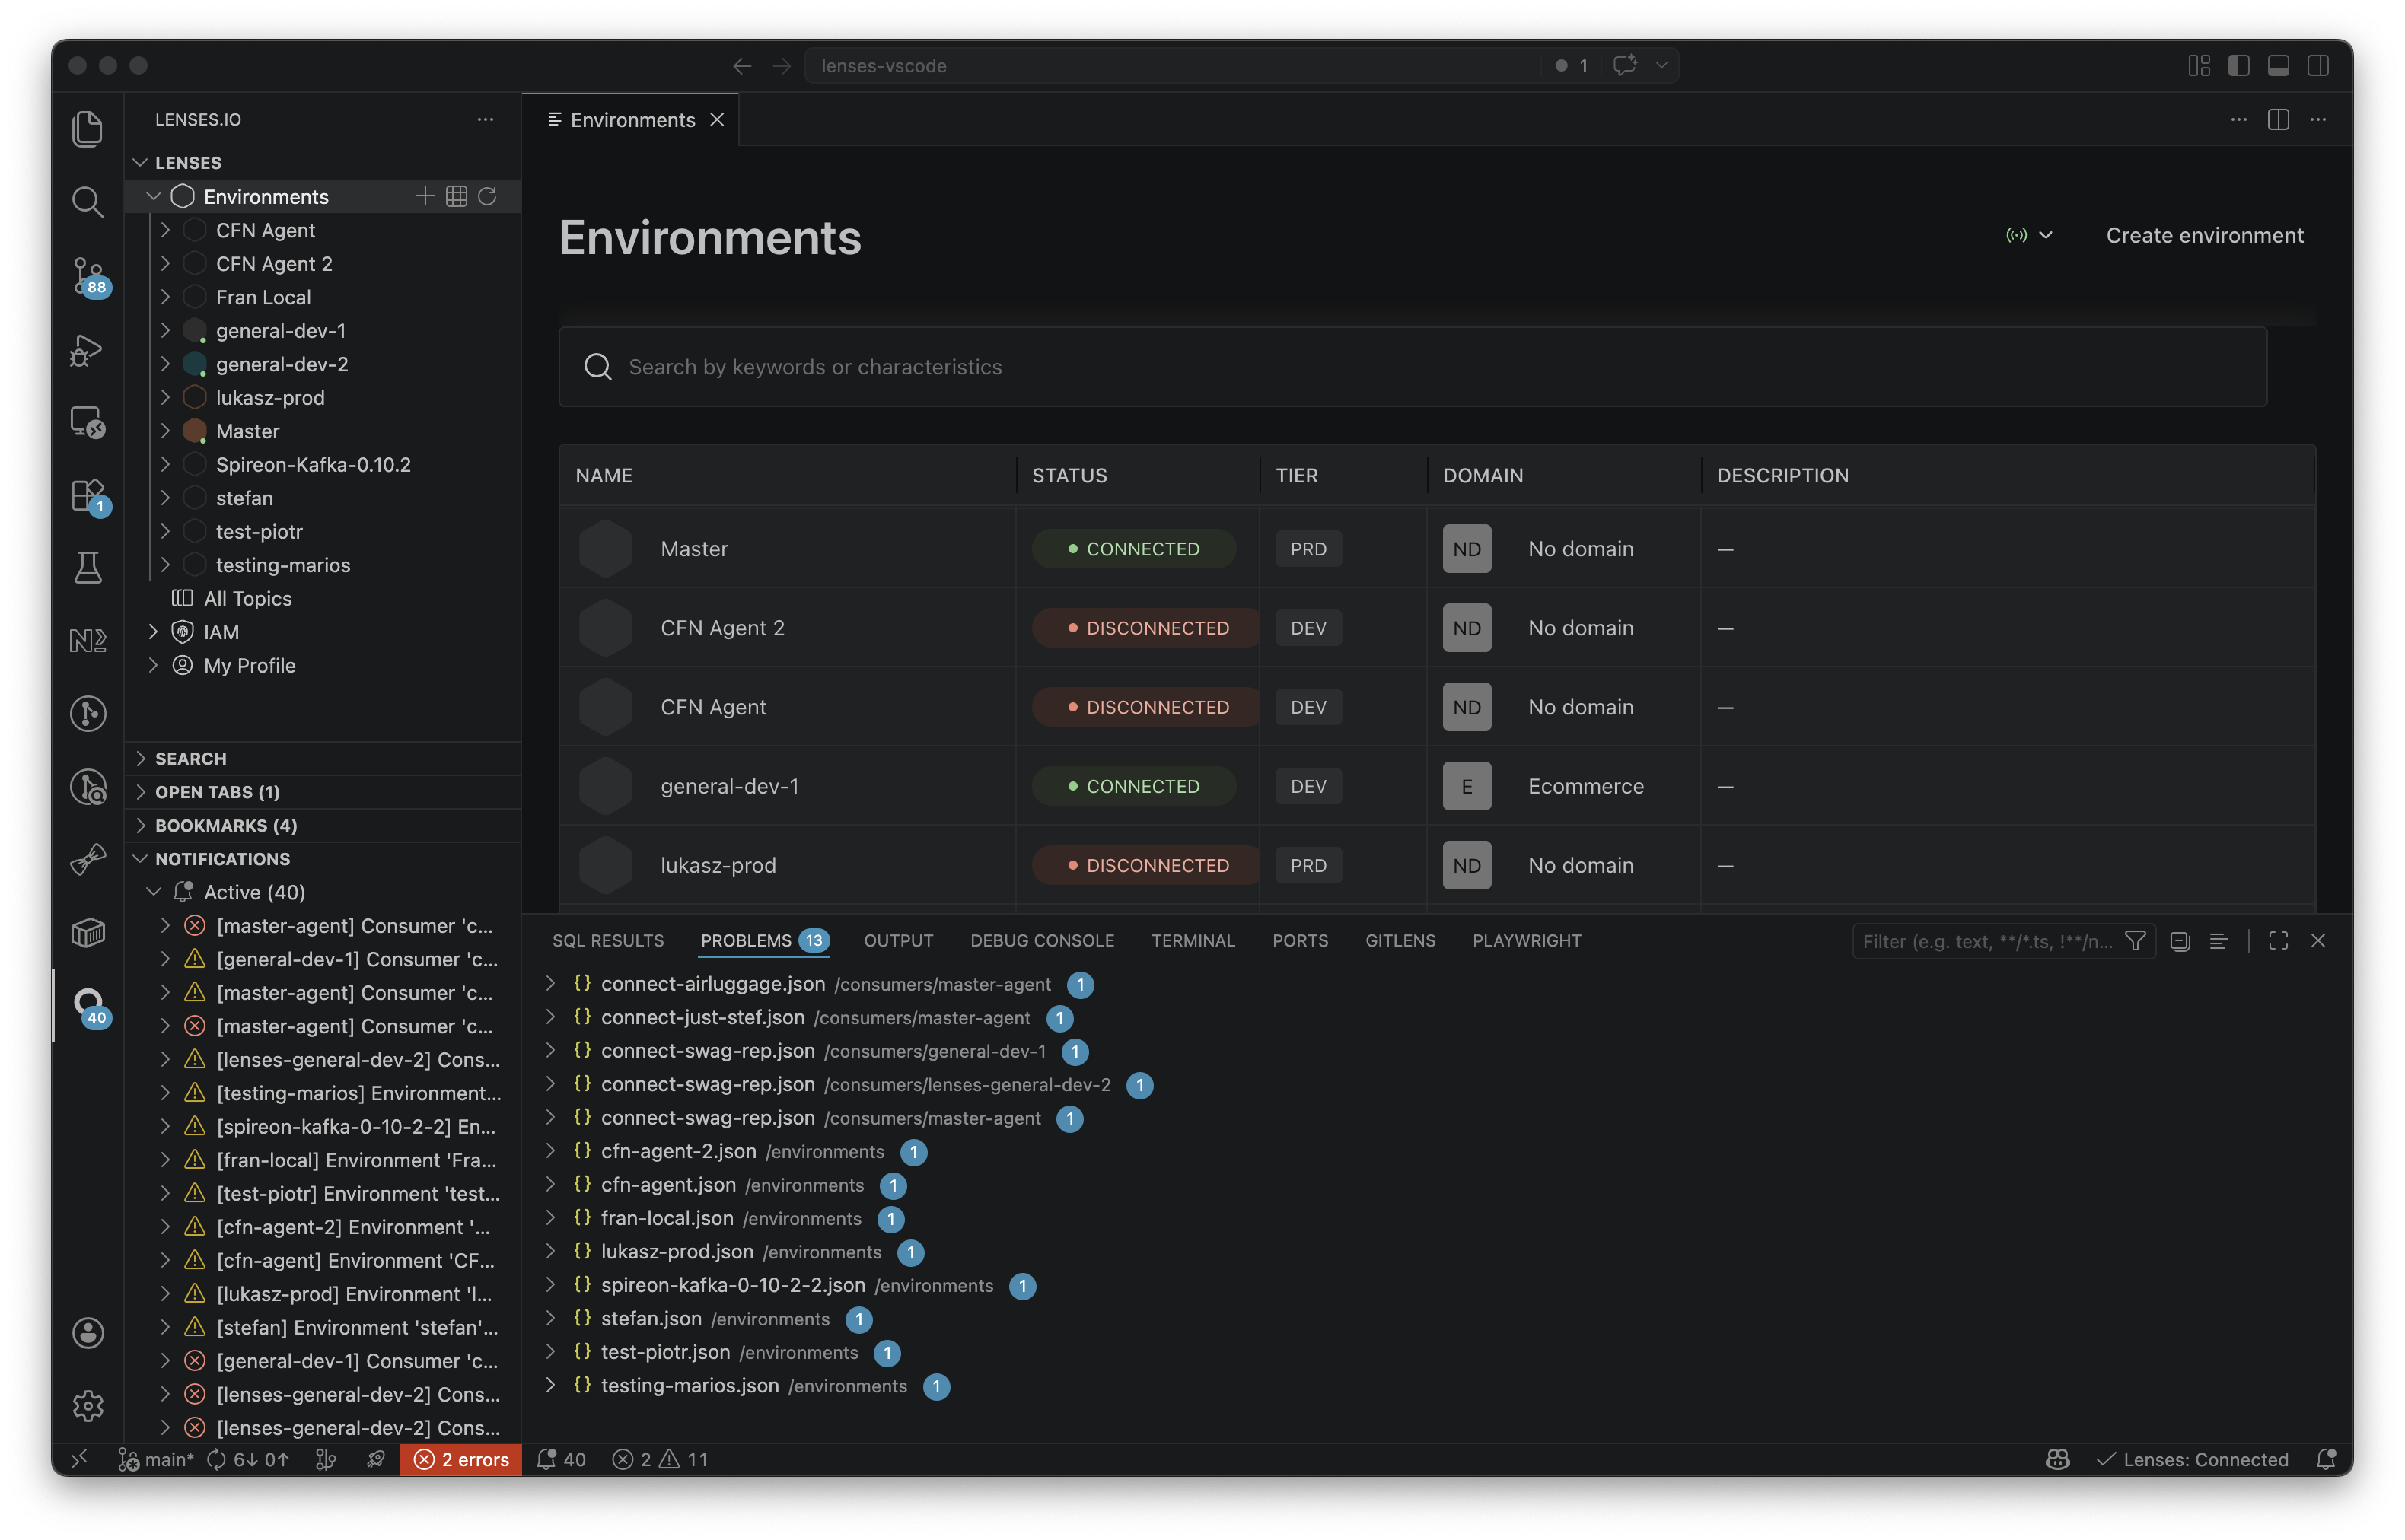
#### Explore environments
View and search all your Kafka environments with status indicators.
* Each environment shows a green or red indicator so you can see at a glance whether the Lenses agent is connected
* Click any environment name to explore its topics, schemas, and connectors
#### Create environments
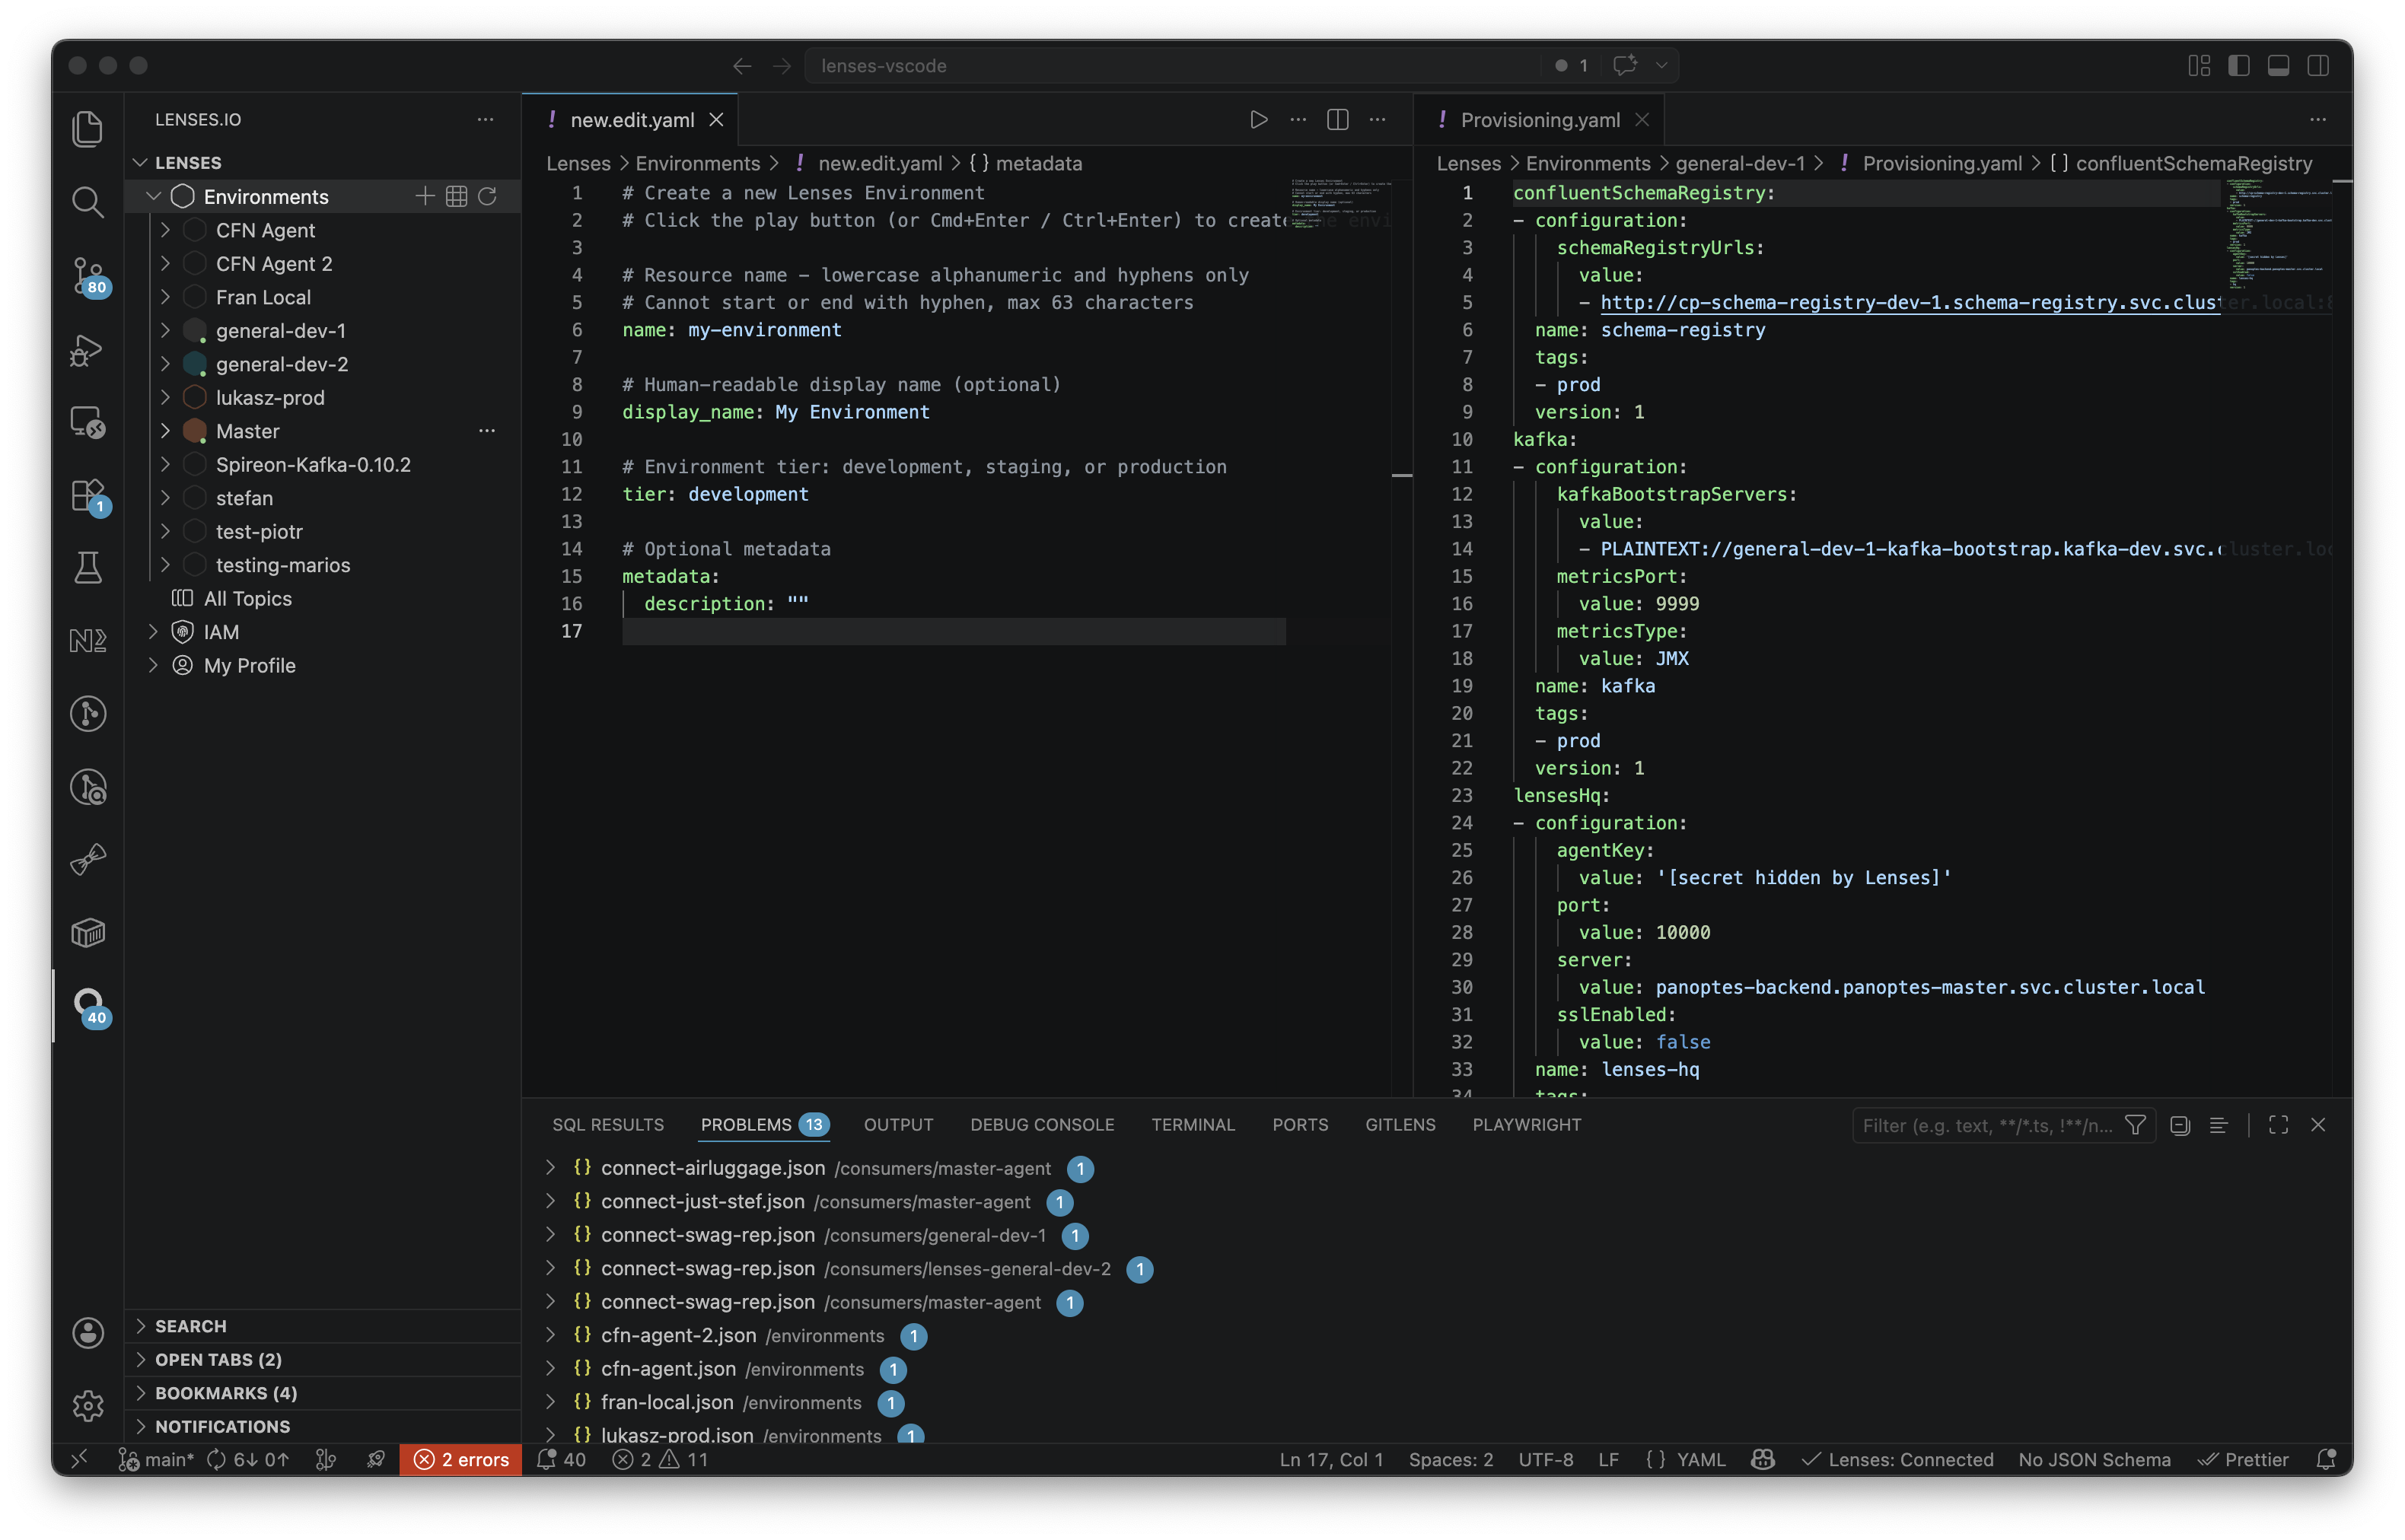
Create new Kafka environments with a guided workflow directly from VS Code.
1. In **Environments**, click the **+** icon. Alternatively, run **Lenses: Create Environment** from the Command Palette.
2. In the YAML editor, define the environment profile with full schema validation.
3. After creation, deploy the agent. If your Lenses HQ is **local** (for example, localhost or a private network), run or paste a Docker command, **copy the agent key** for later, or skip deployment. If you connect to a **remote/cloud** HQ, copy the agent key and deploy where your HQ can reach the agent. The extension does not offer local Docker because it would not connect.
4. When using local Docker from the extension, wait for connection polling to finish or cancel it.
5. Once connected, transition to provisioning configuration.
The guided workflow walks you through environment definition and agent handoff; remote setups rely on copying the agent key into your own deployment process.
### Topics
#### Create topics
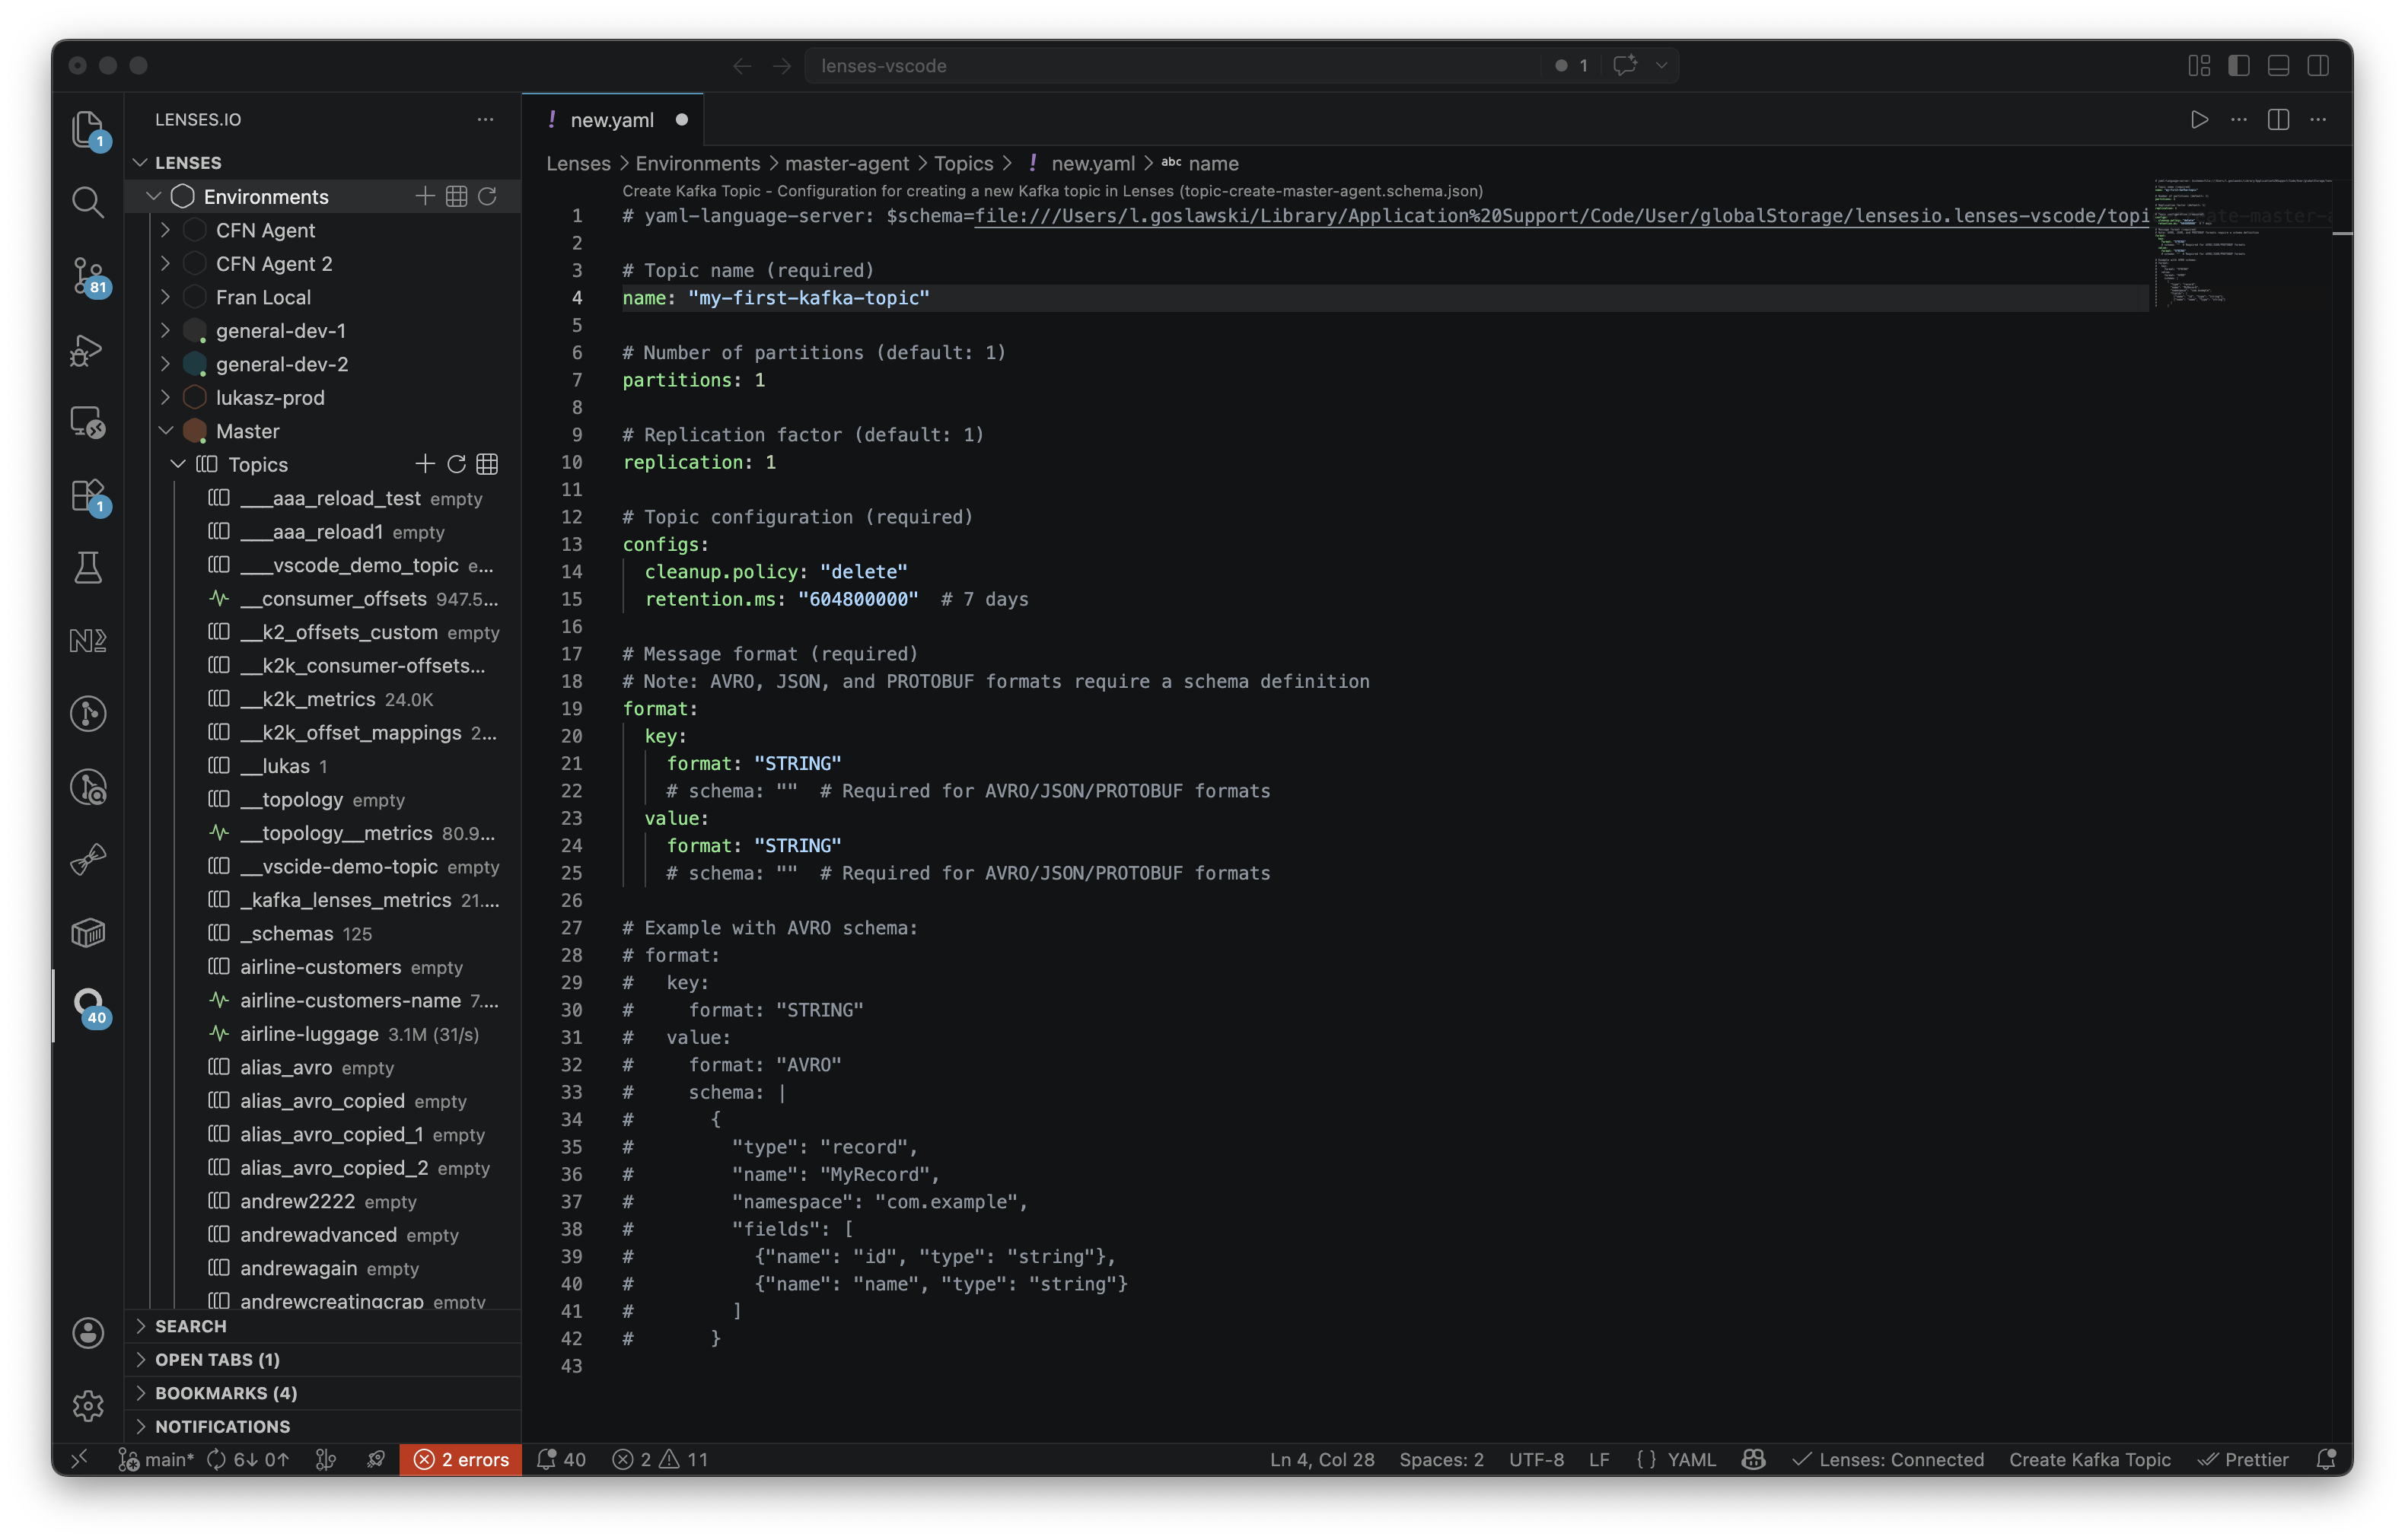
Create new Kafka topics directly from VS Code with full schema validation and autocompletion.
To create a topic, in the tree, click the **+** icon next to **Topics**. Alternatively, open the Command Palette and choose **Lenses: Create Topic**. The extension opens a YAML editor with schema validation and autocompletion for partitions, replication, and other Kafka topic settings. After you click **Create**, the topic appears in the list before the backend finishes setup. Wait until setup completes before working with the topic. Setup can take a few minutes.
#### Insert messages
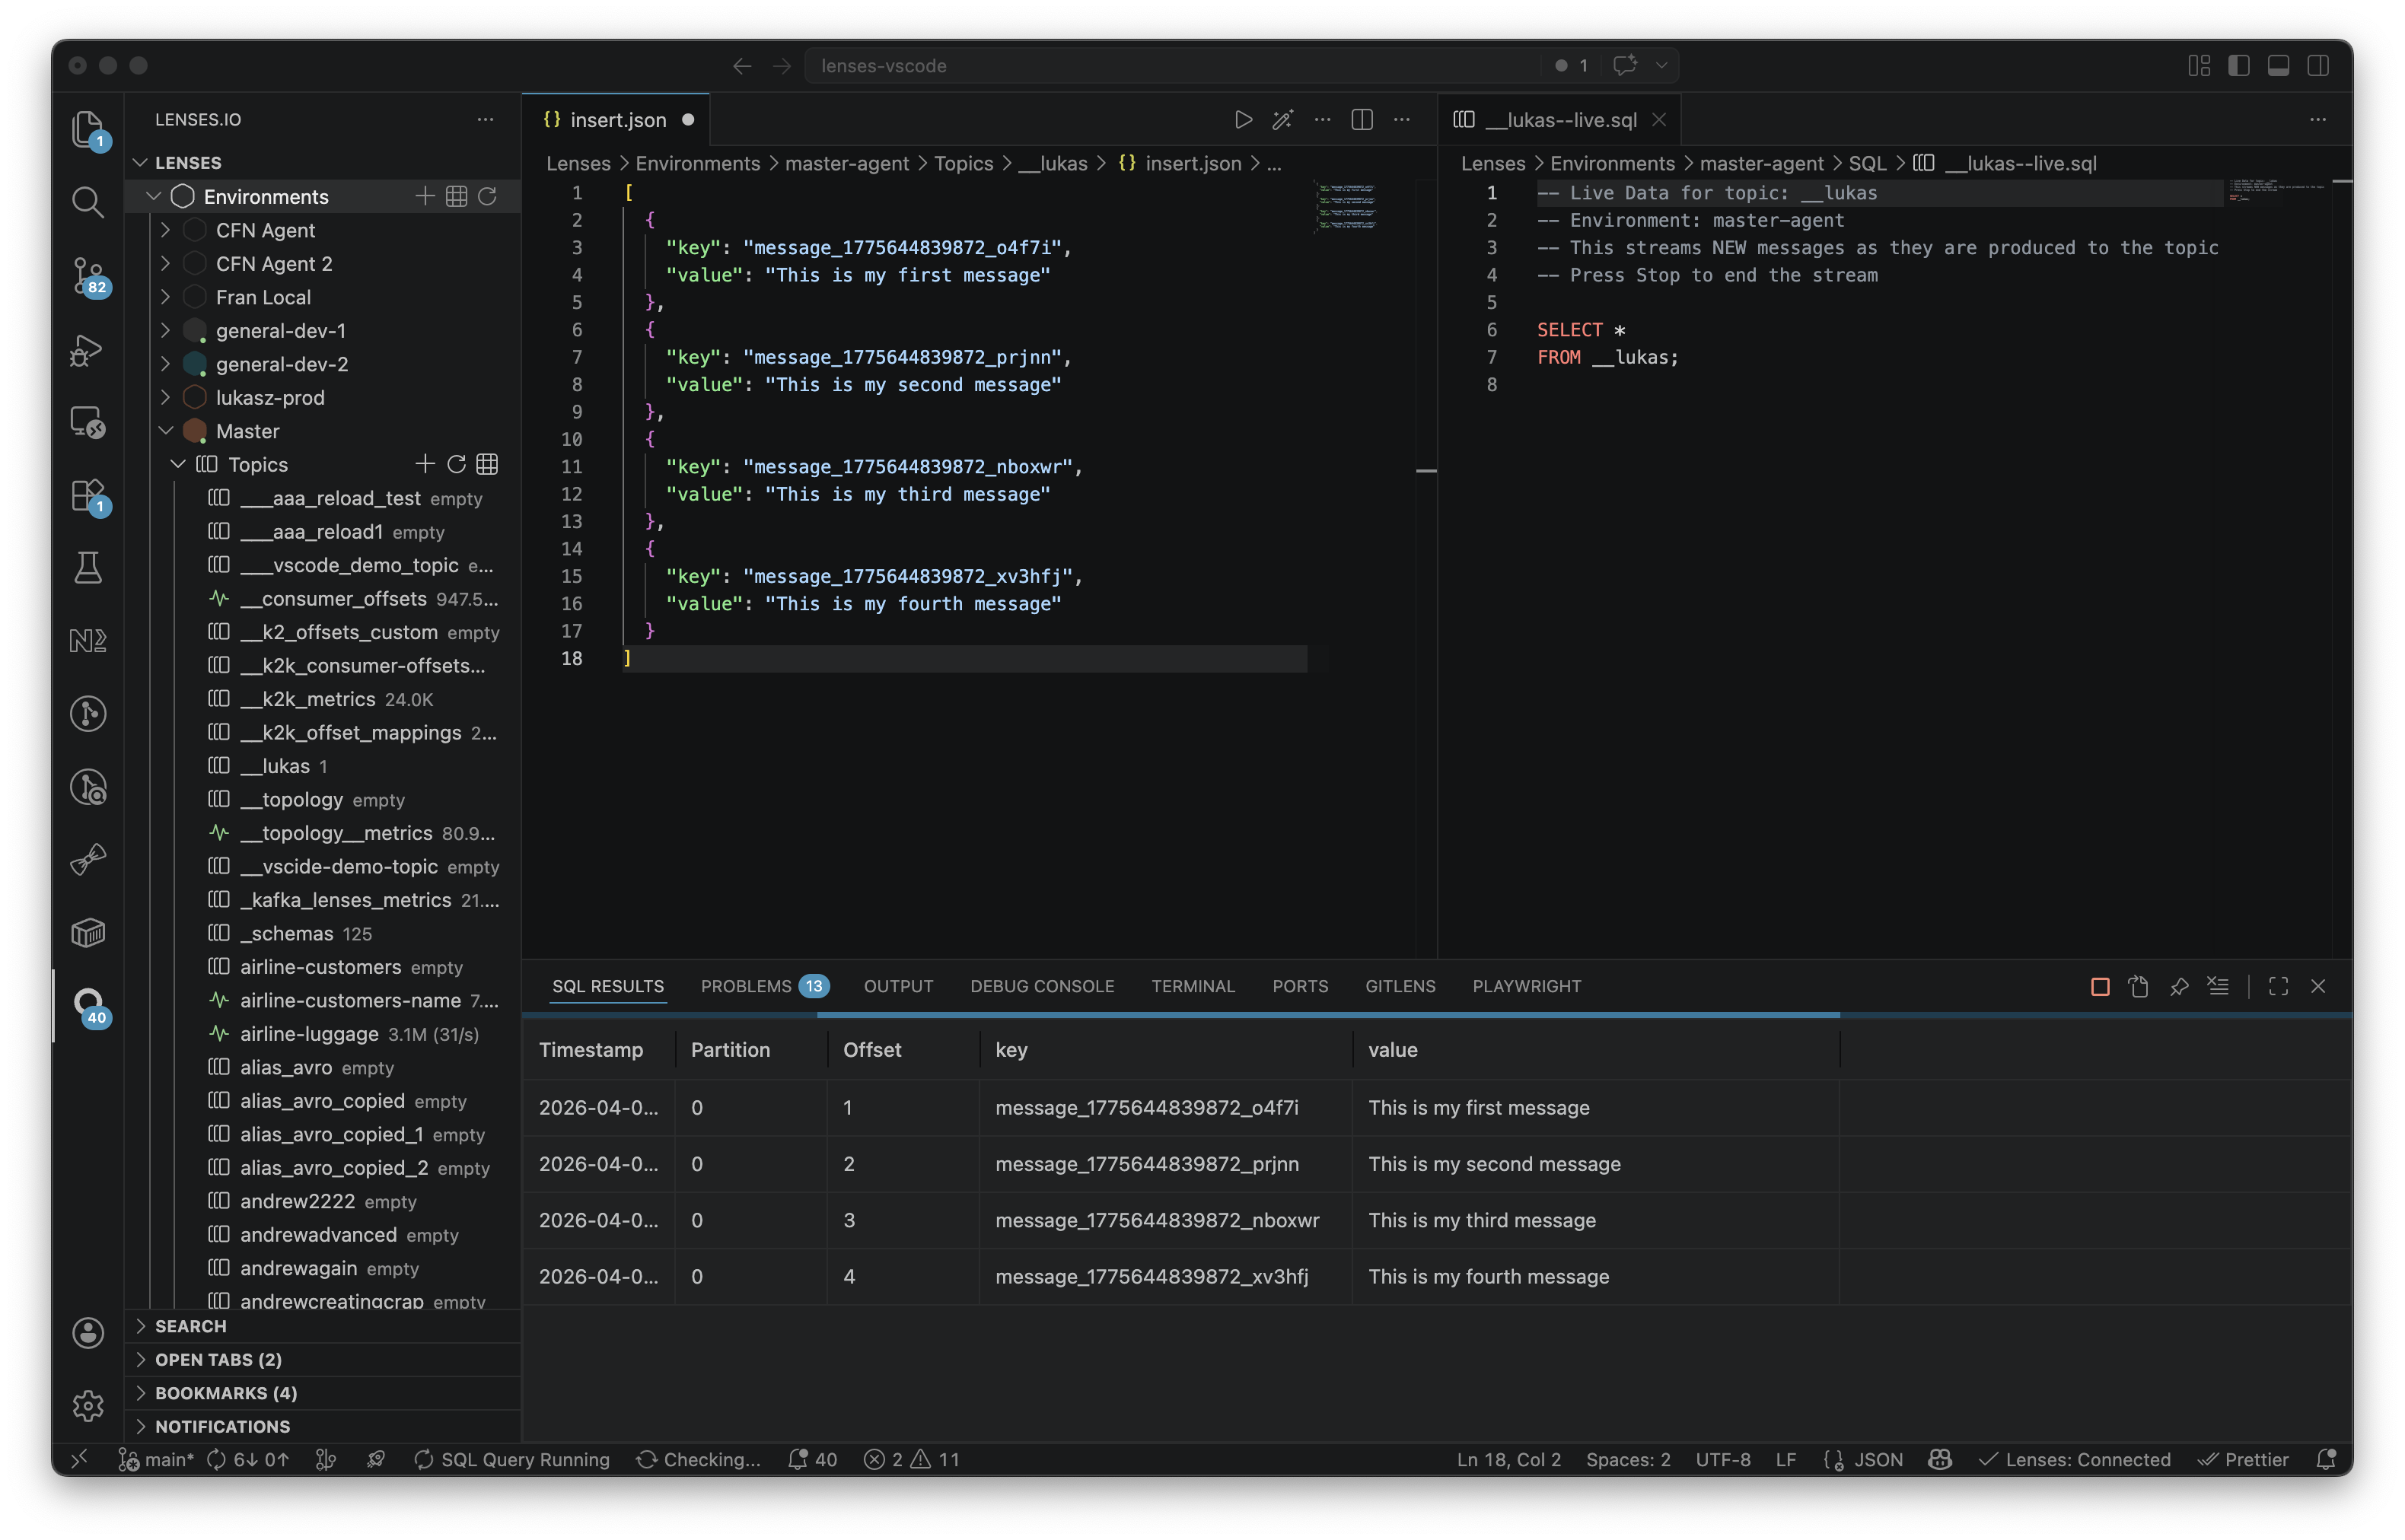
Insert messages directly into Kafka topics with full schema validation and autocompletion.
To add test messages to a topic, right-click it and choose **Insert Messages**. The JSON editor checks your input in real time against the topic's schema. The editor can generate sample messages from the topic’s AVRO or JSON schema. Provide a key, value, and optional headers, then click **Play** to send the messages. After insertion, the extension opens a pre-filled SQL query for viewing the data. If issues occur, VS Code shows errors inline and in the **Problems** panel.
#### Query topic data
Browse and query topics with the integrated SQL editor.
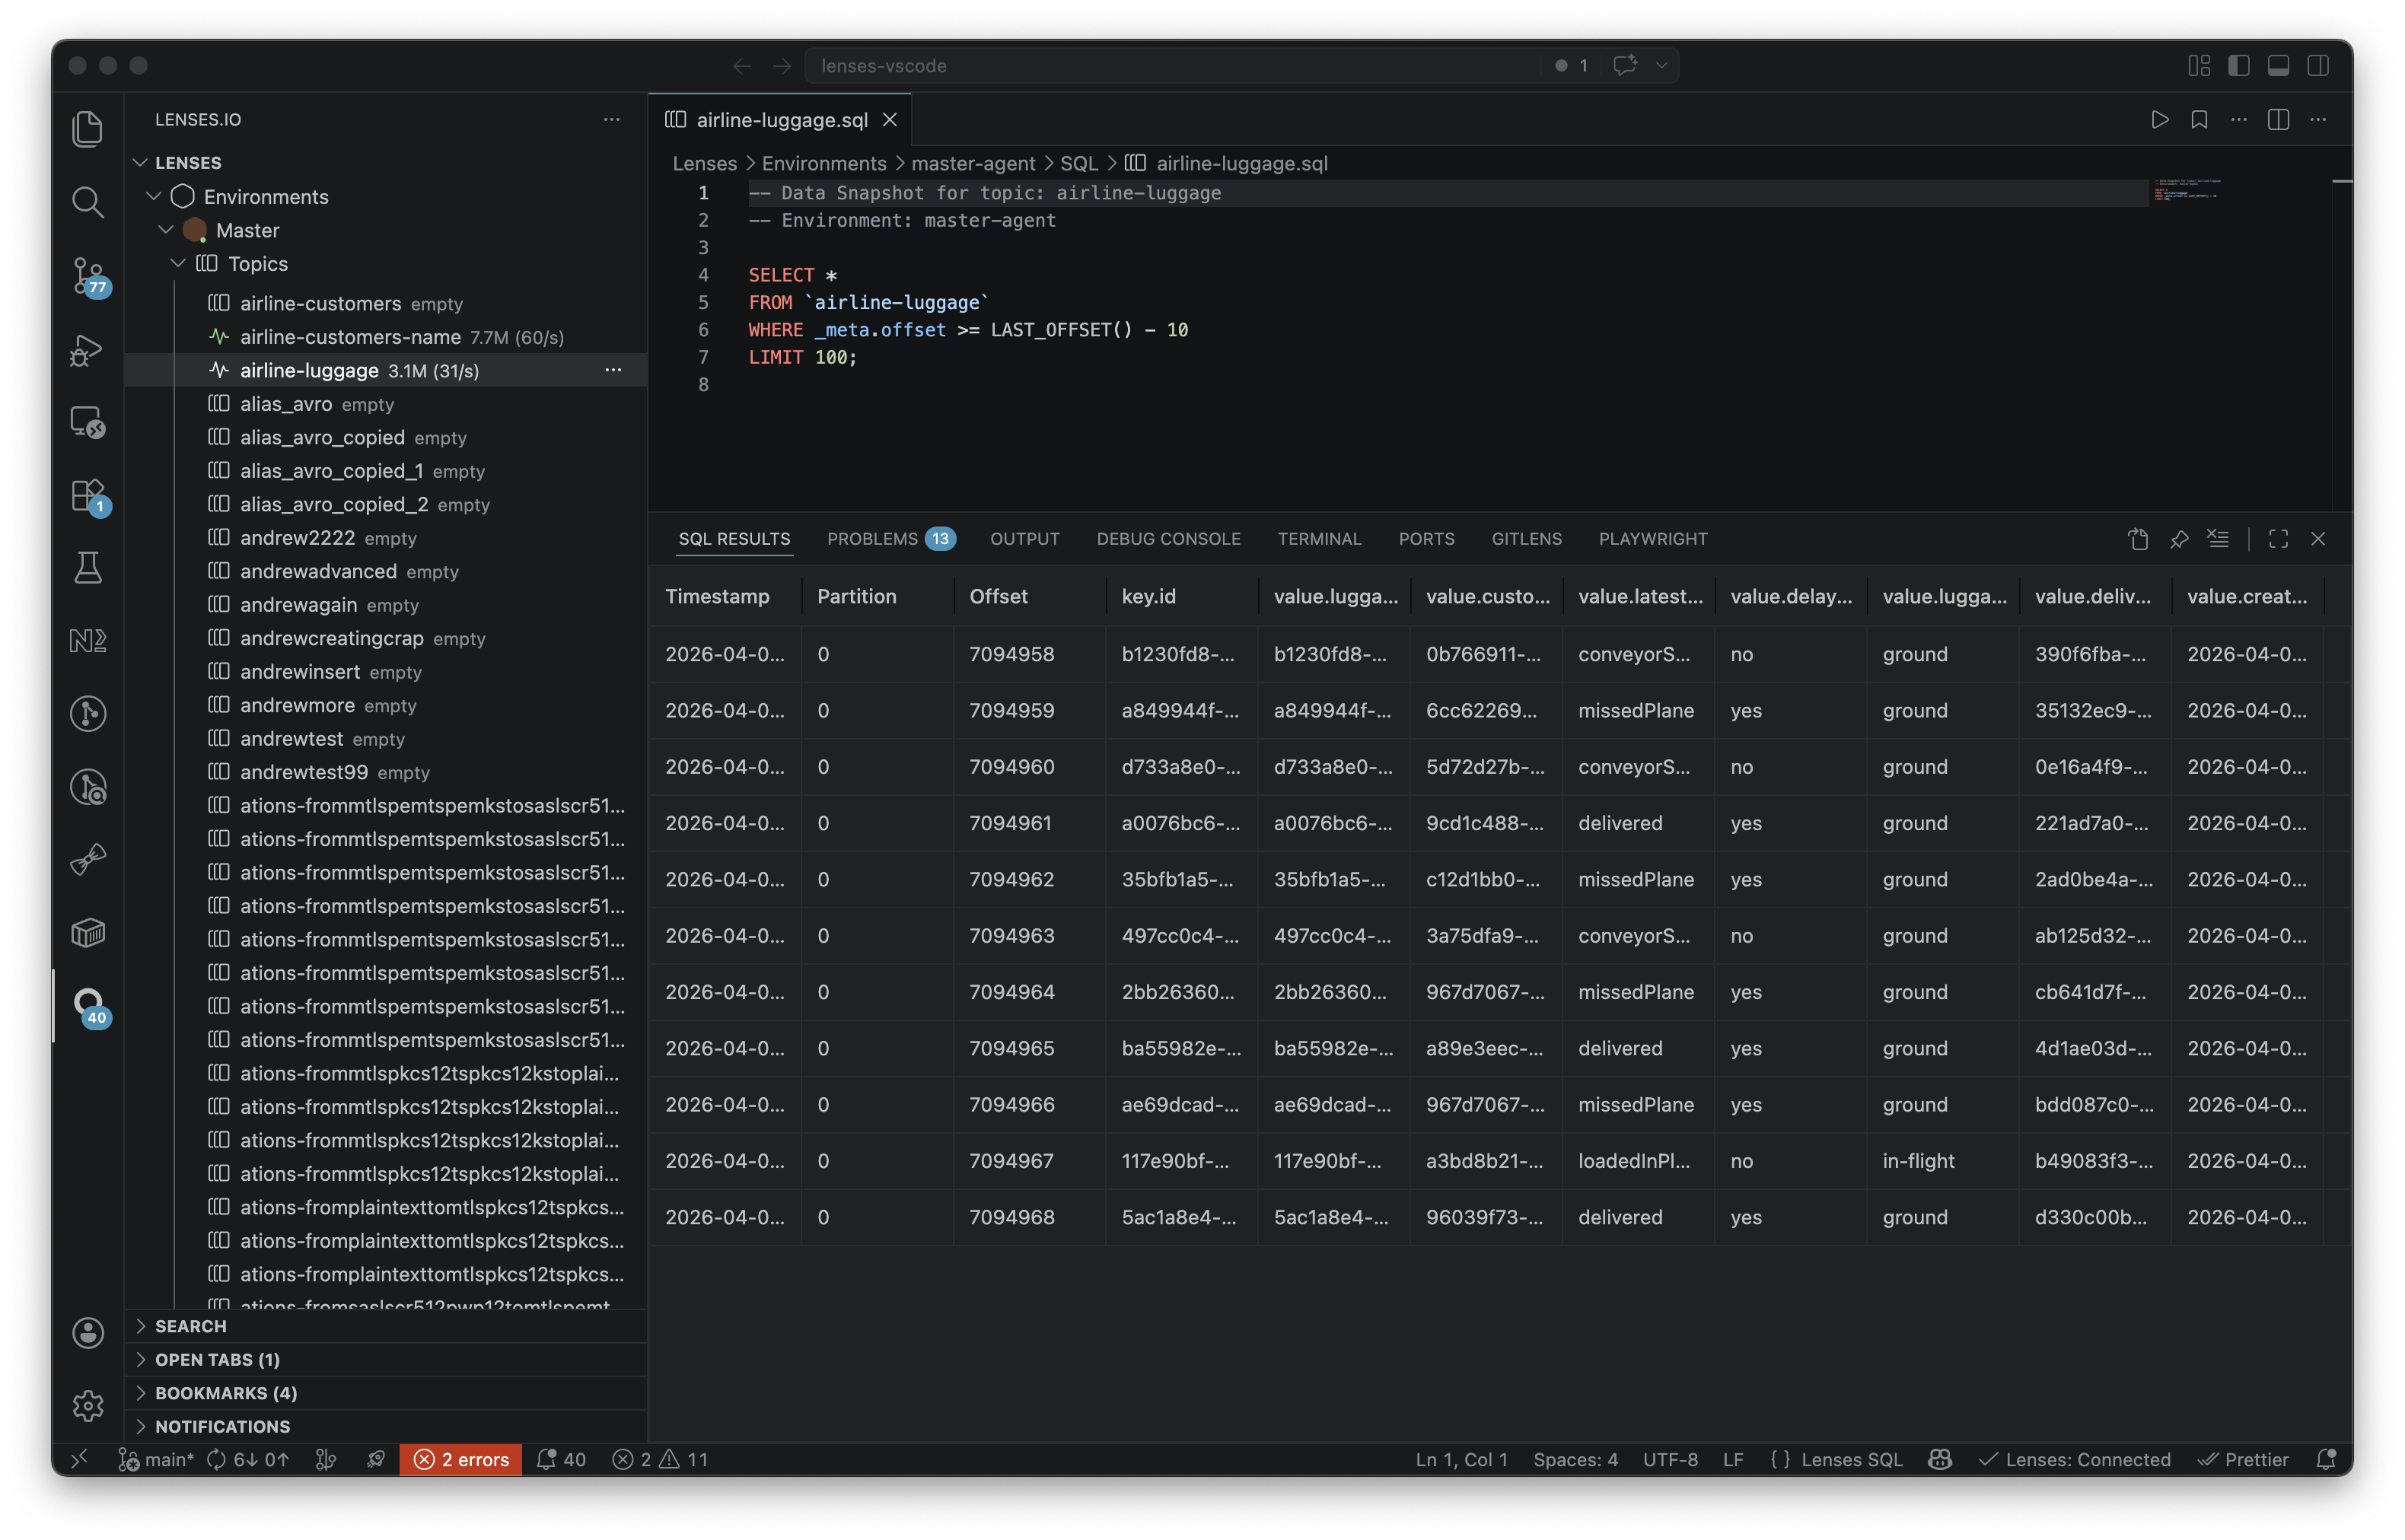
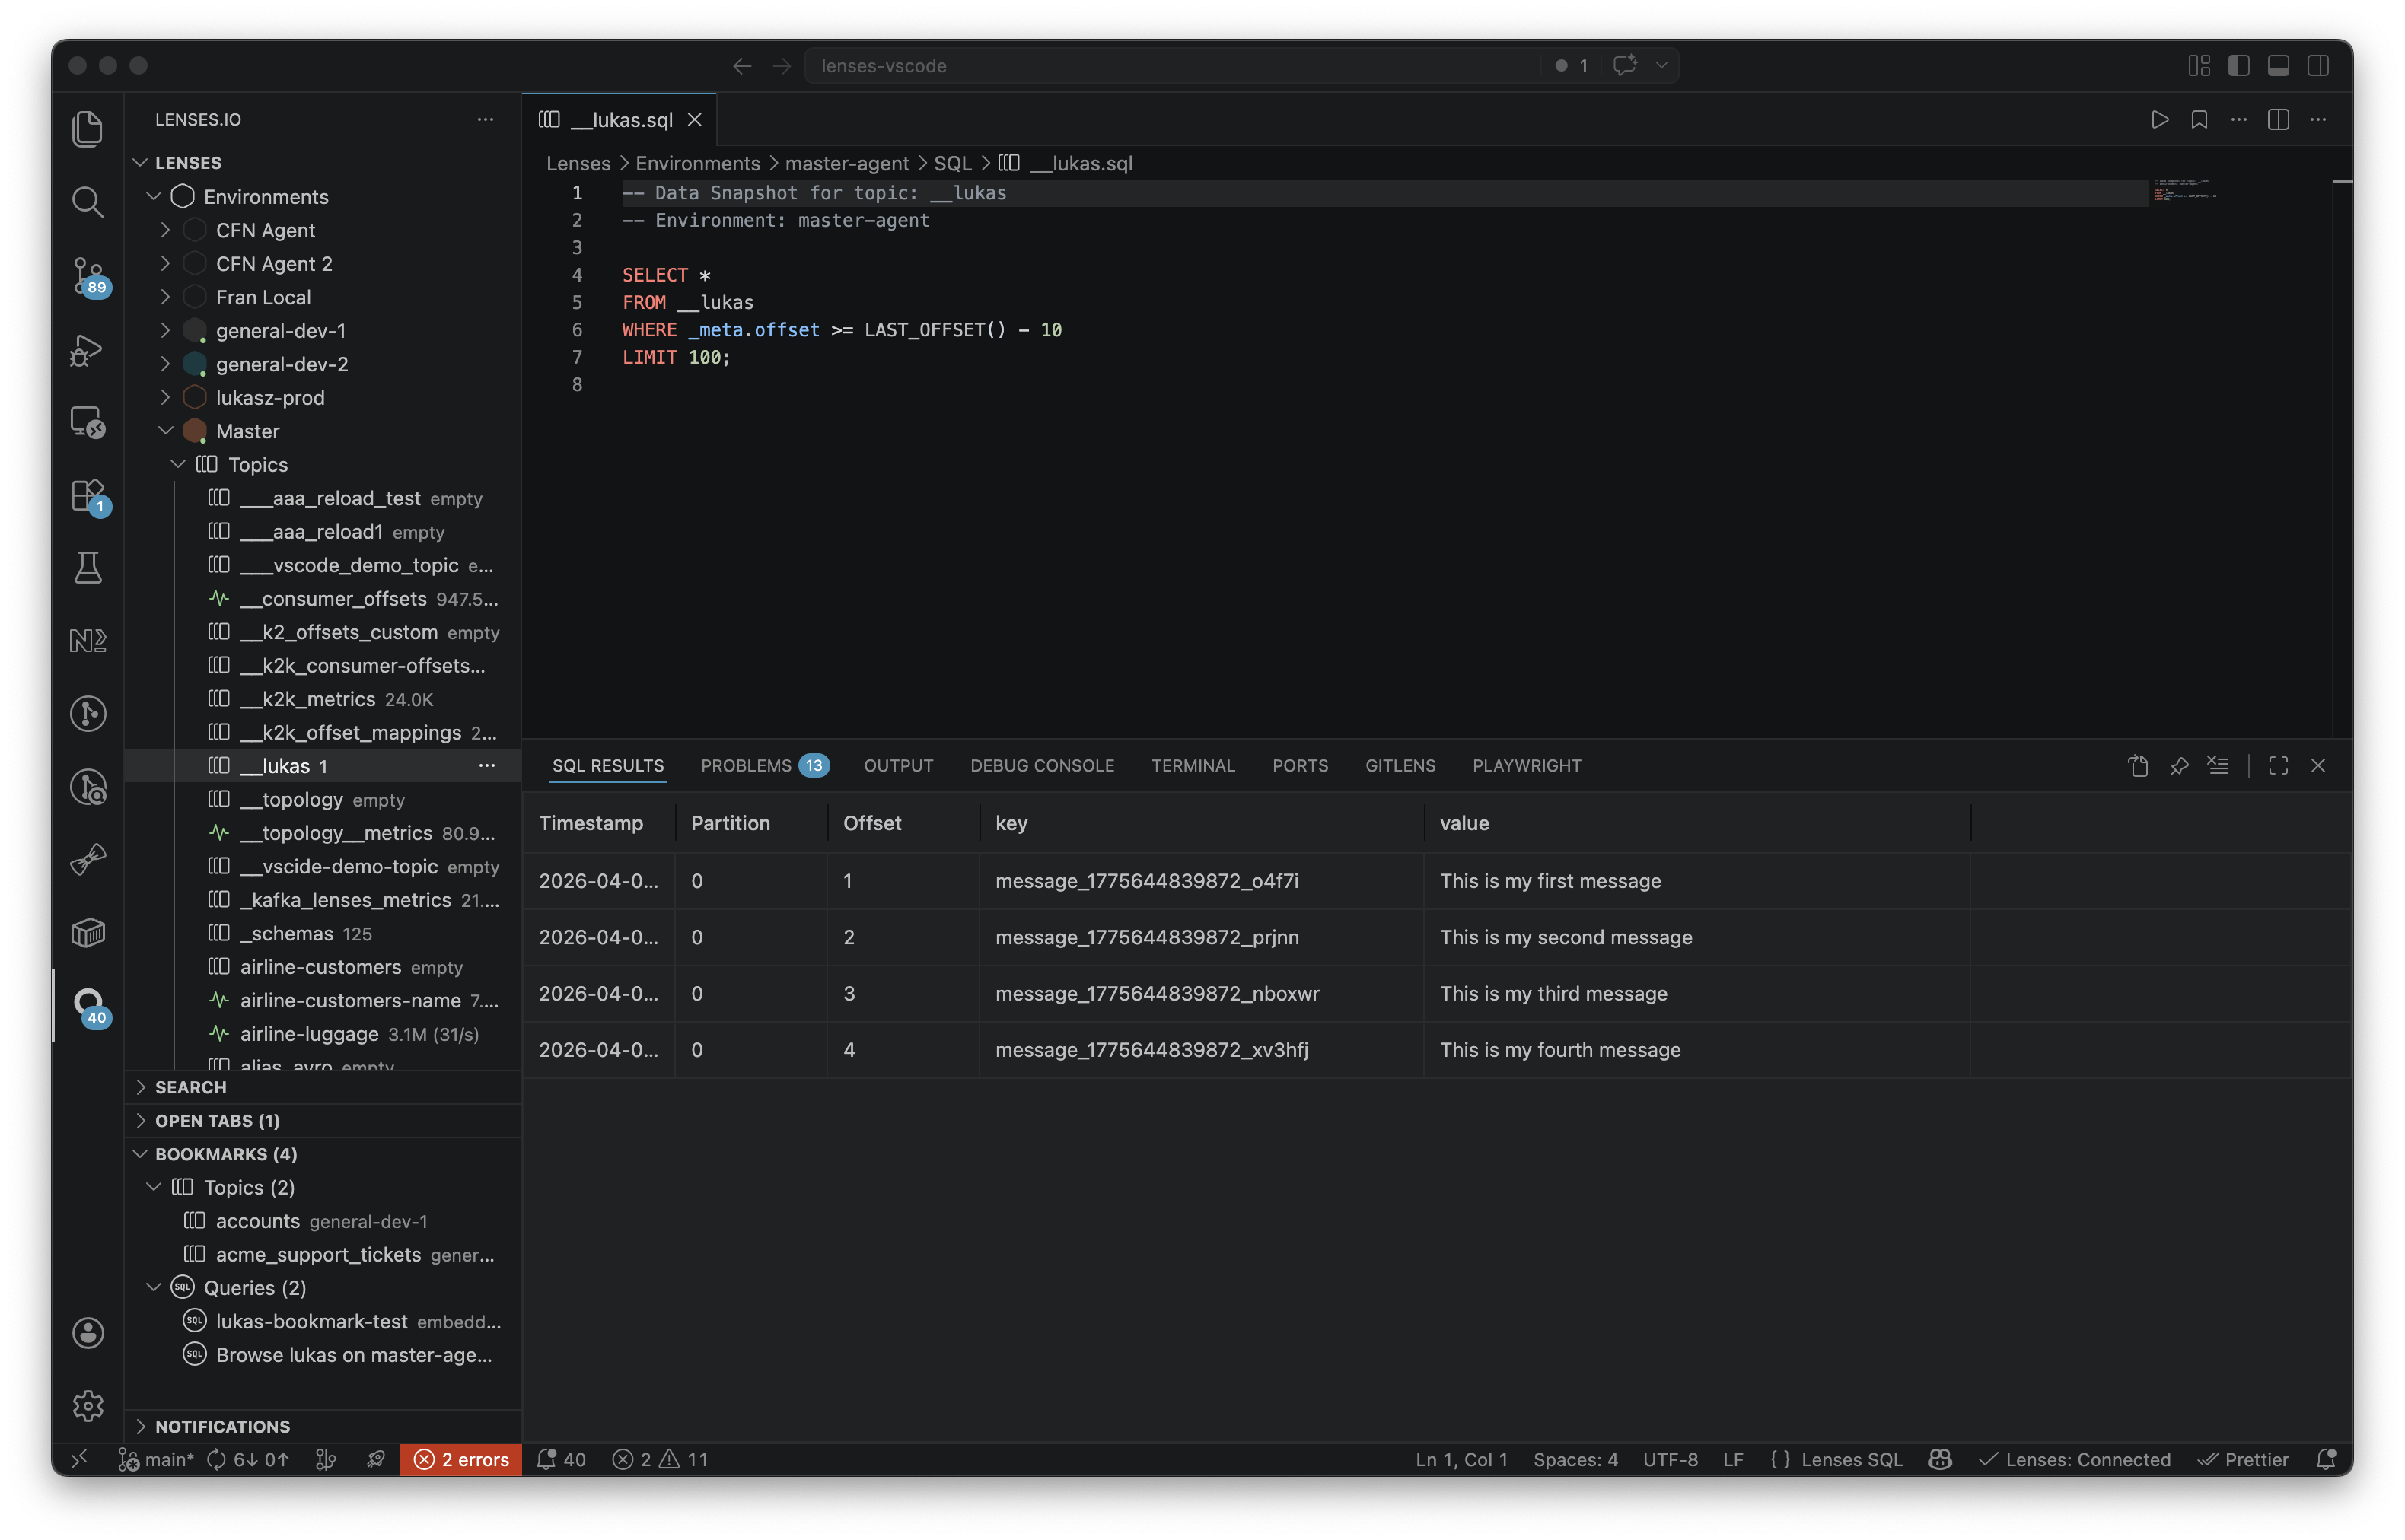
**Data Snapshot:** In the tree, click or right-click a topic, then select **Data Snapshot** to query historical data with SQL:
Use the following query:
```sql
SELECT *
FROM my-topic
WHERE _meta.offset >= LAST_OFFSET() - 10
LIMIT 10;
```
Press `Cmd+Enter` to run the query or click **Play**. Results appear in the bottom panel below the editor.
**Live Data:** For real-time streaming, right-click a topic and select **Live Data**. This opens a streaming SQL query panel that continuously shows records as they arrive.
Use the following query:
```sql
SELECT *
FROM my-topic
```
* You can stop the stream and resume later
* Add SQL filters to narrow down what you see in real time
* Keep an eye on high-throughput topics, as they can increase memory and CPU usage
Results appear in an interactive data grid in the bottom panel, showing all message fields with sorting and filtering. You can control live data behavior with the `lenses.sql.liveData.maxRecords` and `lenses.sql.liveData.rateWarningEnabled` settings.
#### Edit topic configuration
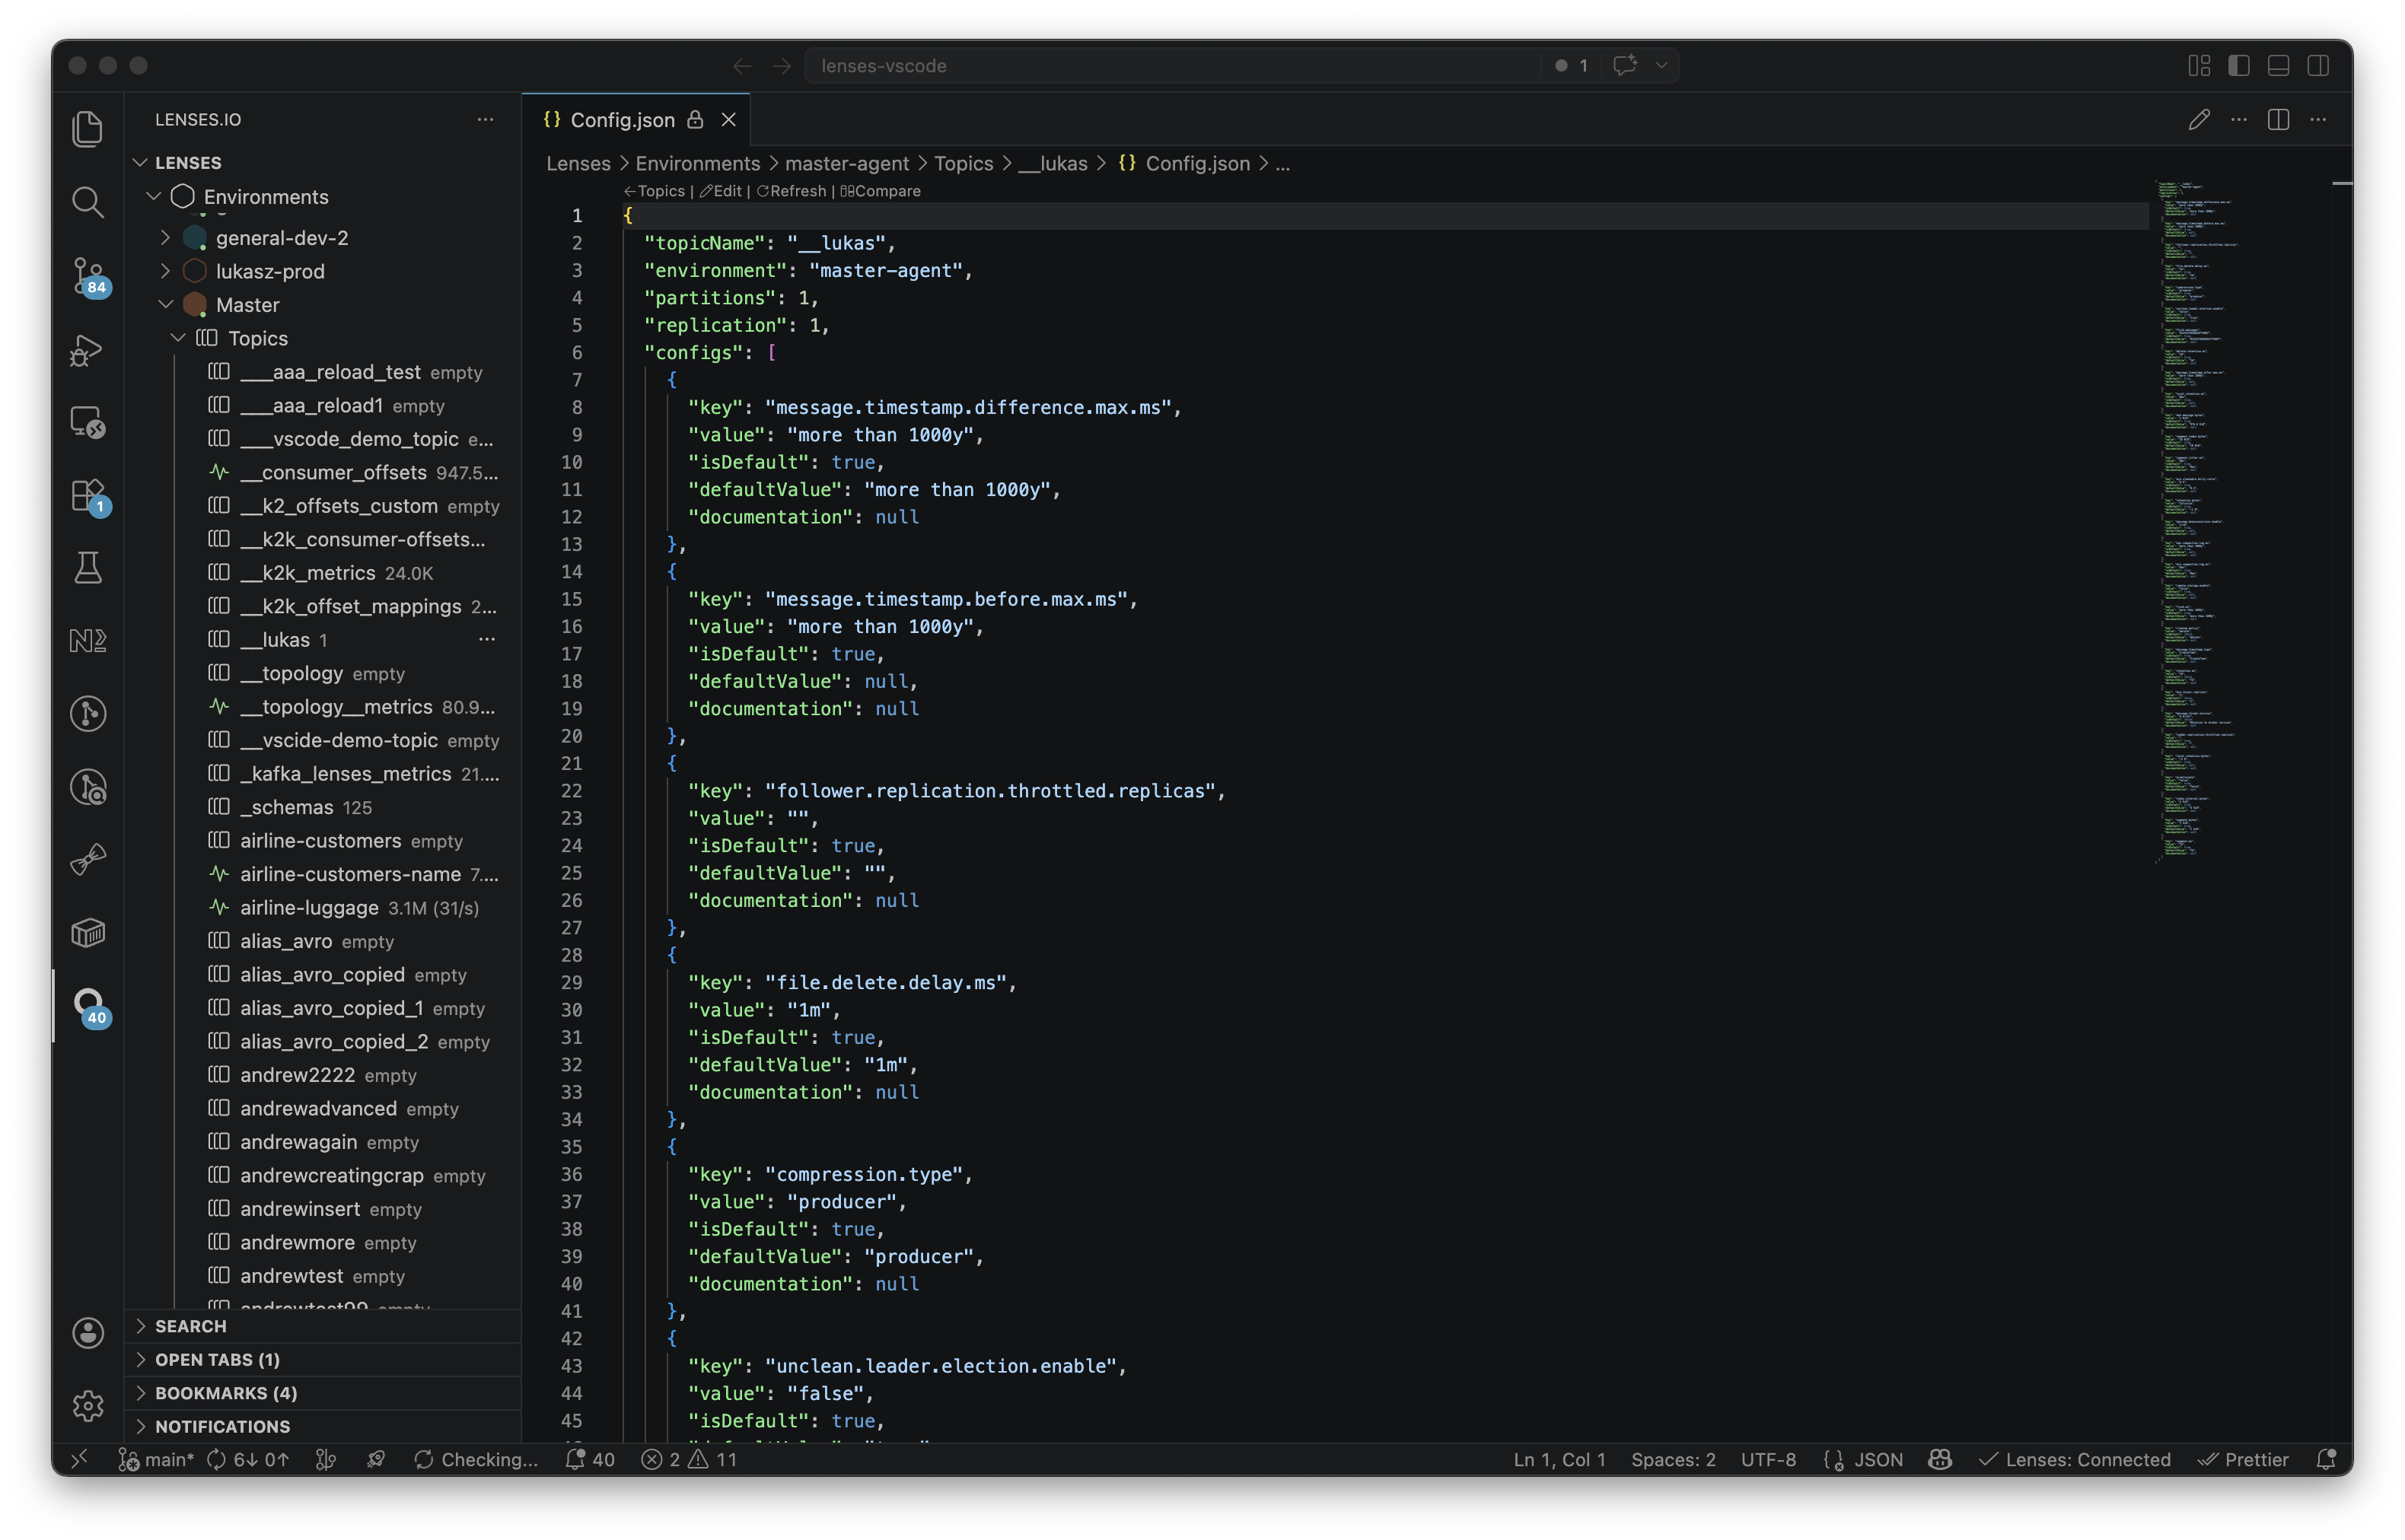
Edit topic configurations directly in VS Code's native JSON editor.
* JSON schema validation highlights errors inline as you type
* Hover over any property to see its documentation
* When you apply changes, only the values you actually modified are sent to the API
#### Manage schemas
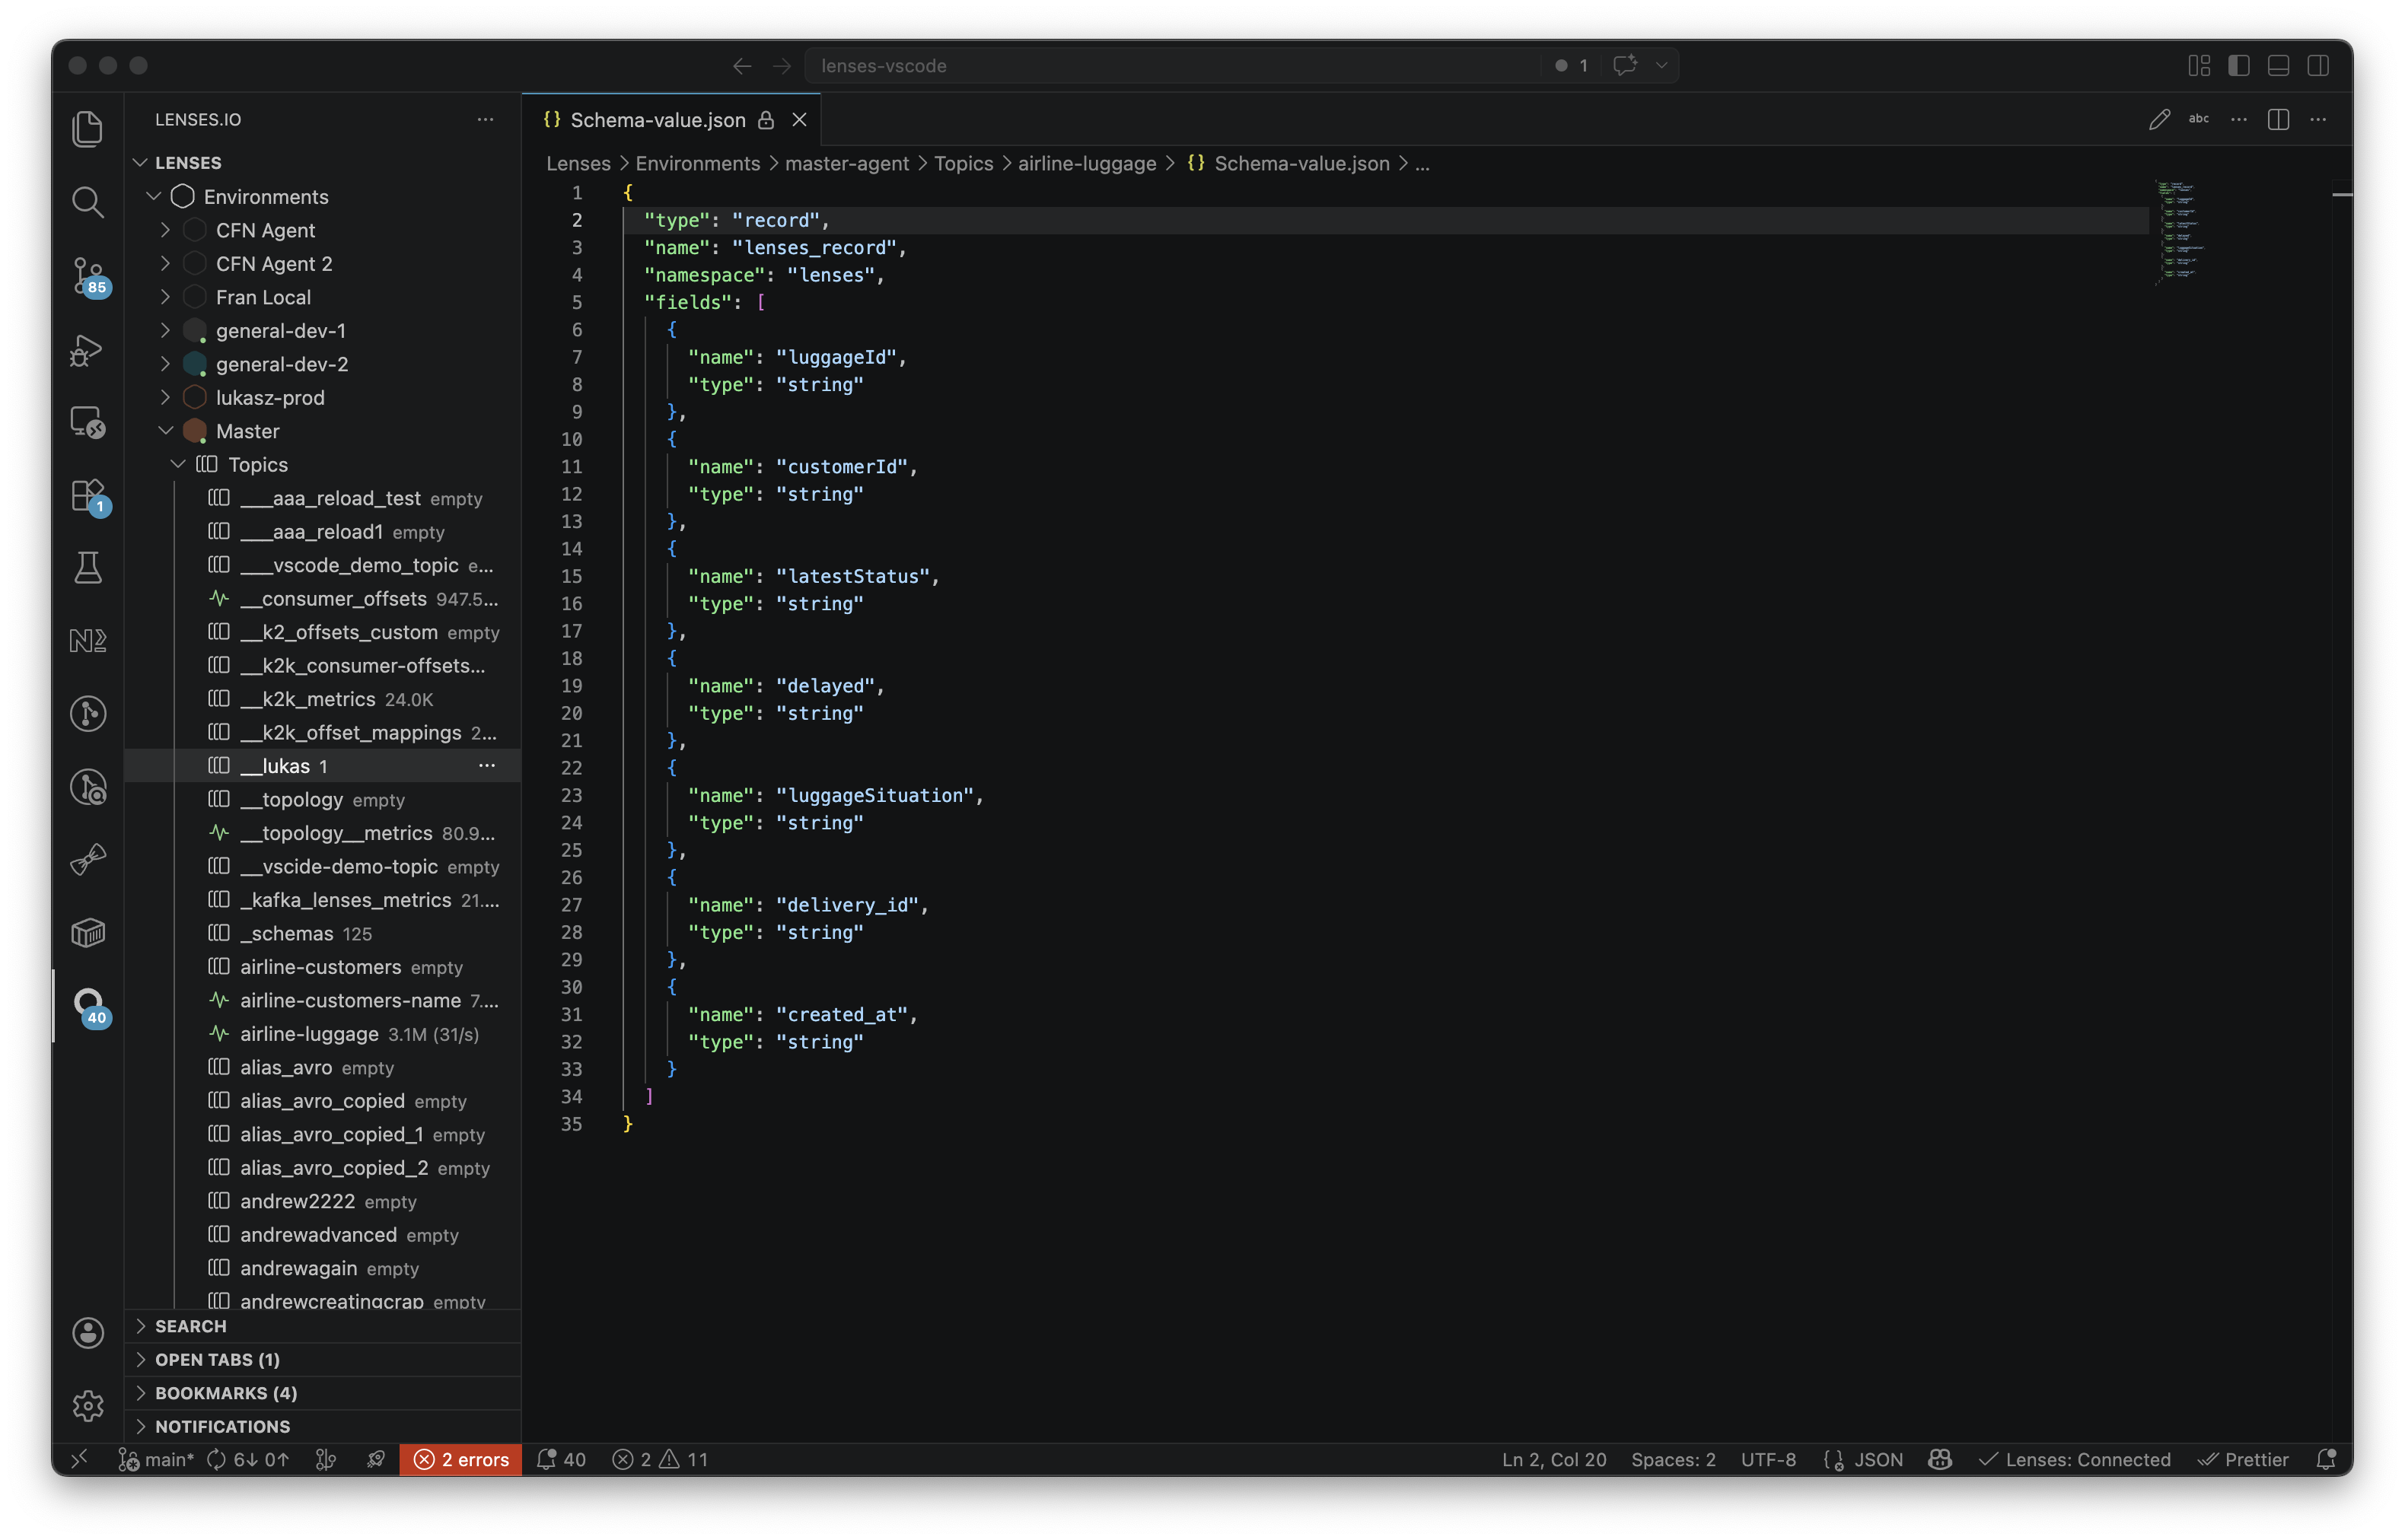
View and manage topic schemas with version history.
* View both key and value schemas for any topic
* Browse through previous versions using the version dropdown
* Compare any two schema versions side by side to see what changed
* Edit schemas directly and apply updates from VS Code
### Schema Registry
#### Schema Registry
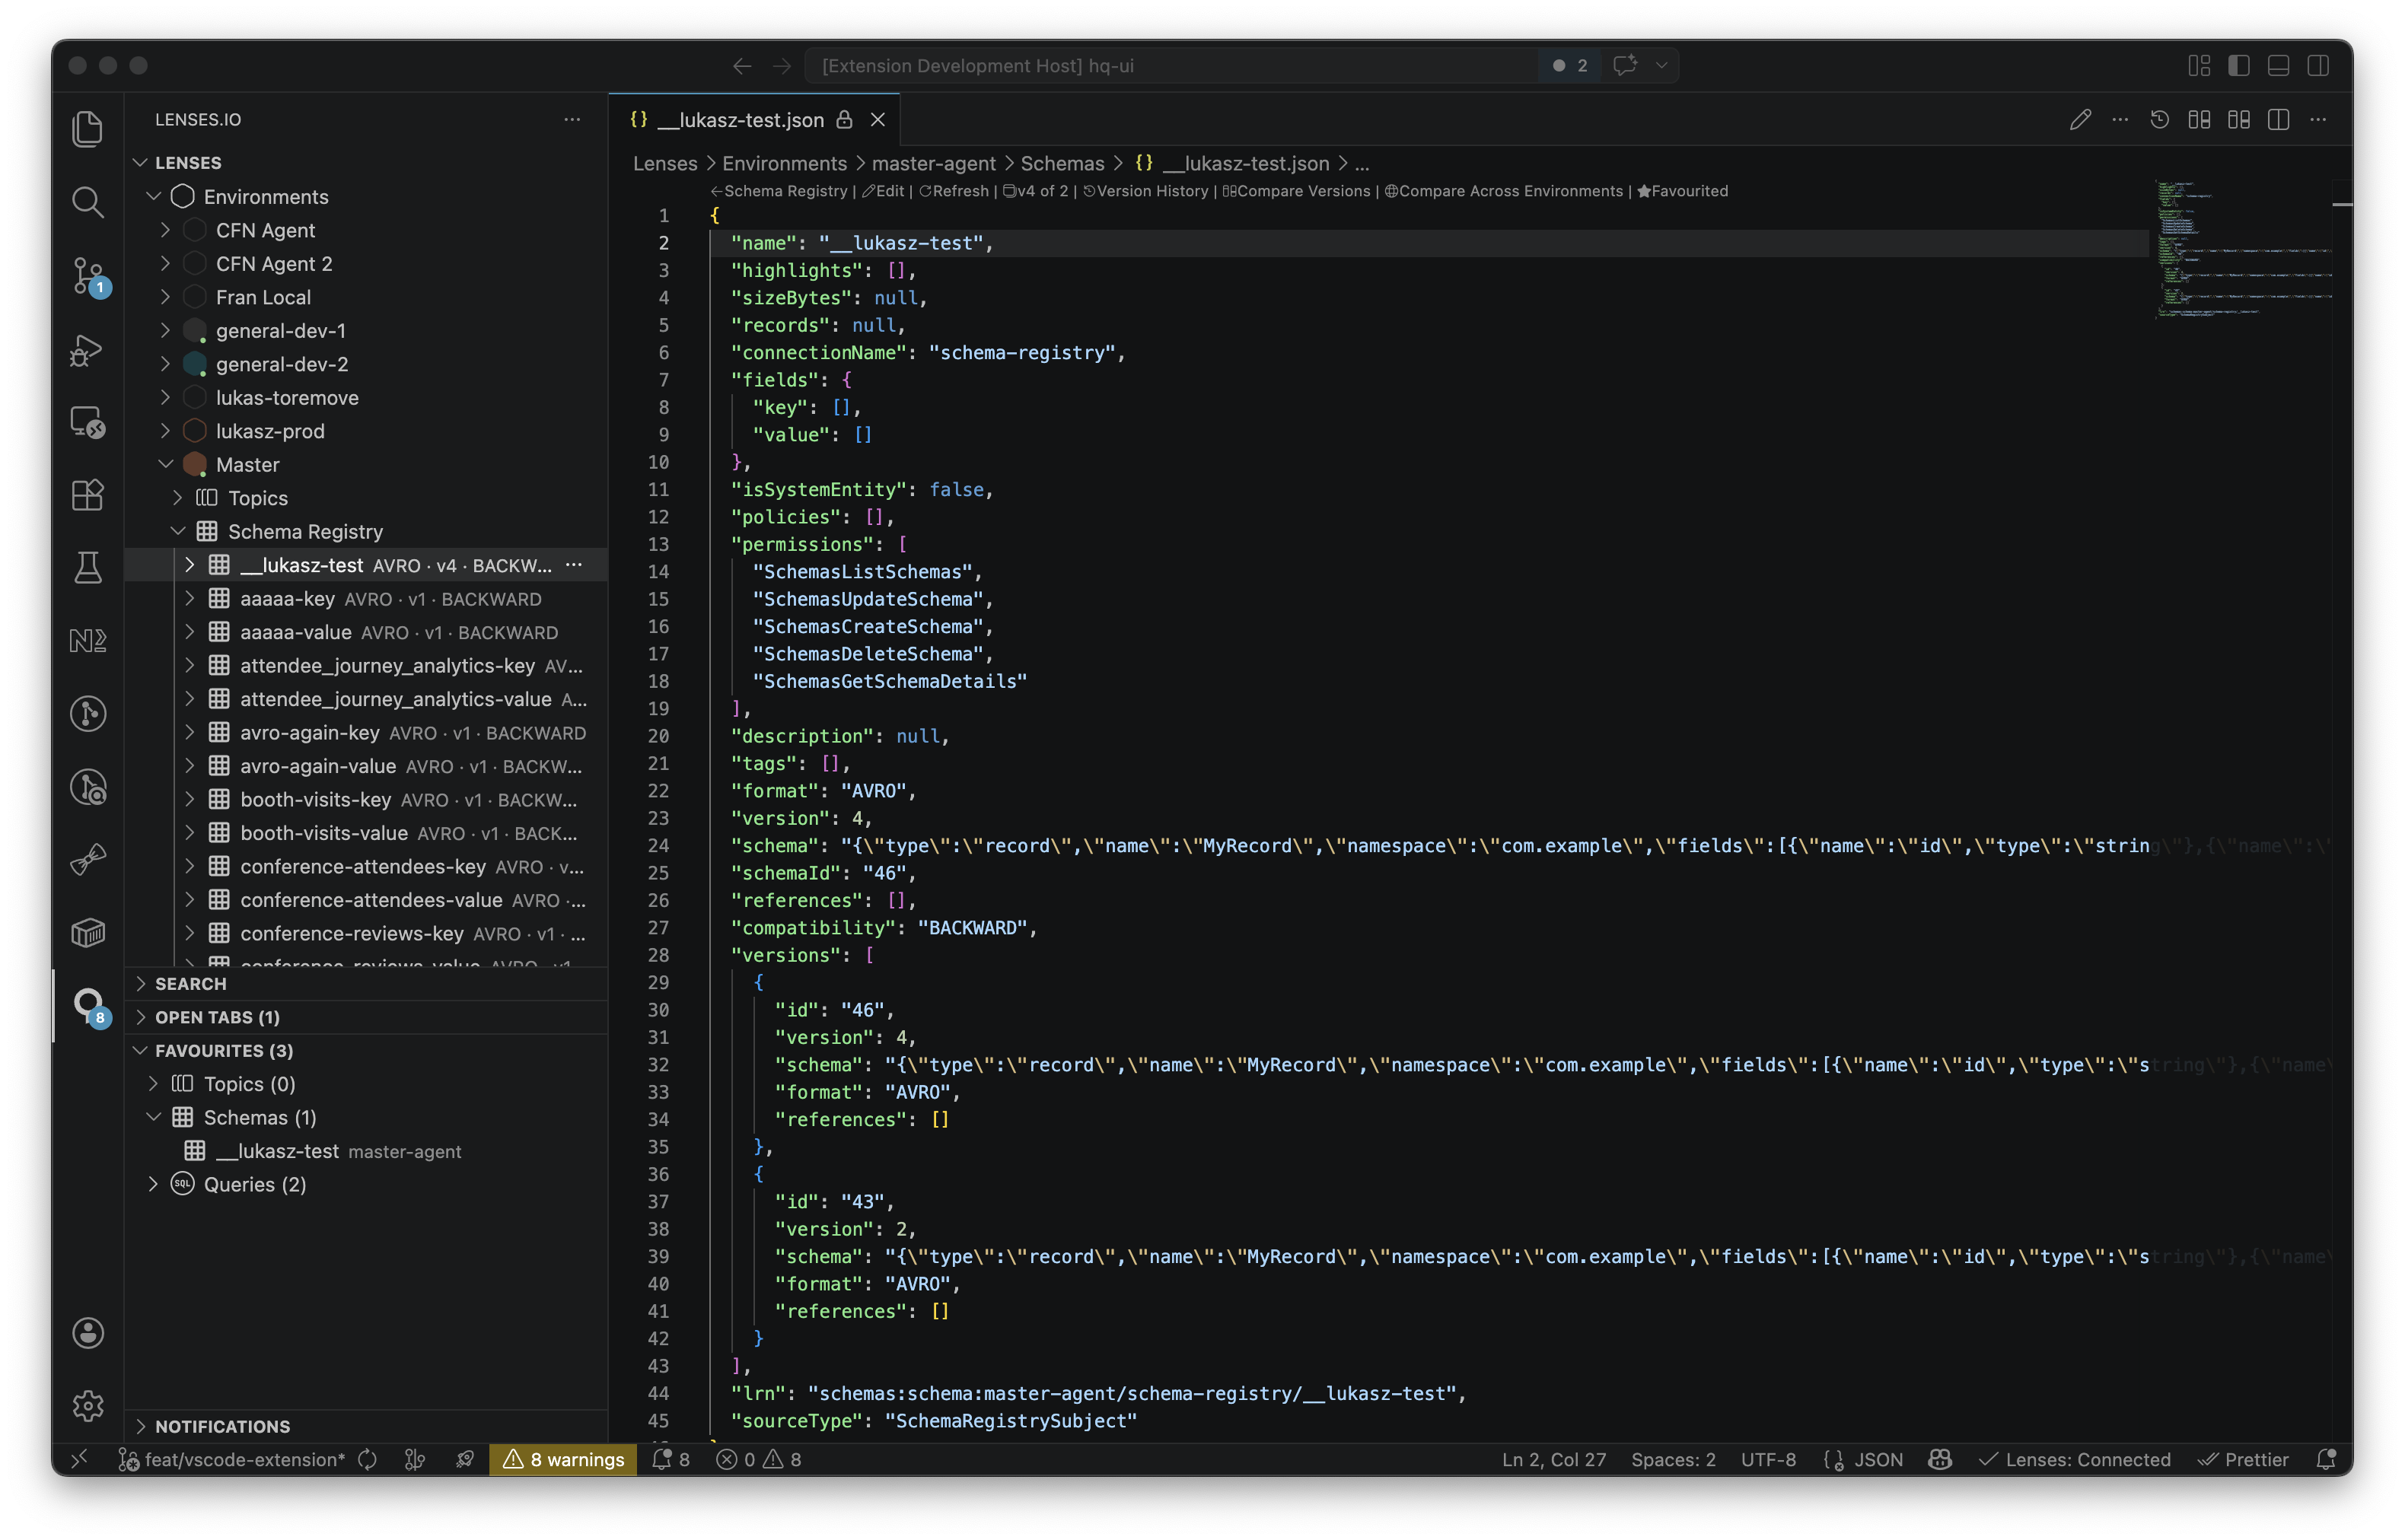
Browse and manage Schema Registry subjects for each environment, right next to its Topics node in the tree.
* Click the **Schema Registry** node under any environment to load every subject. The inline icons let you create a subject (`+`), refresh the list, or open a full listing webview (`$(table)`).
* Click any subject to view its latest schema directly in VS Code's native JSON editor—no extra panels, full syntax highlighting, and foldable AVRO/JSON/Protobuf payloads. Inline CodeLens actions appear above the document to edit, refresh, browse version history, compare versions or environments, and toggle favourites.
* Click the **+** icon (or run **Lenses: Create Schema Subject**) to open a JSON-Schema-validated template document. Fill in `subjectName`, `format` (AVRO / JSON / PROTOBUF), and the `schema` itself. The editor autocompletes valid options and highlights mistakes inline. Saving the document registers the subject through the Lenses API and opens it for review.
* Browse version history for any subject and compare versions side by side using VS Code's native diff editor. Cross-environment comparison lets you spot schema drift between staging and production.
* Delete subjects or individual versions from the tree context menu with confirmation prompts.
* The extension includes Schema Registry subjects in the global search index—press `Cmd+Shift+L` to find any subject instantly across environments.
### Access control
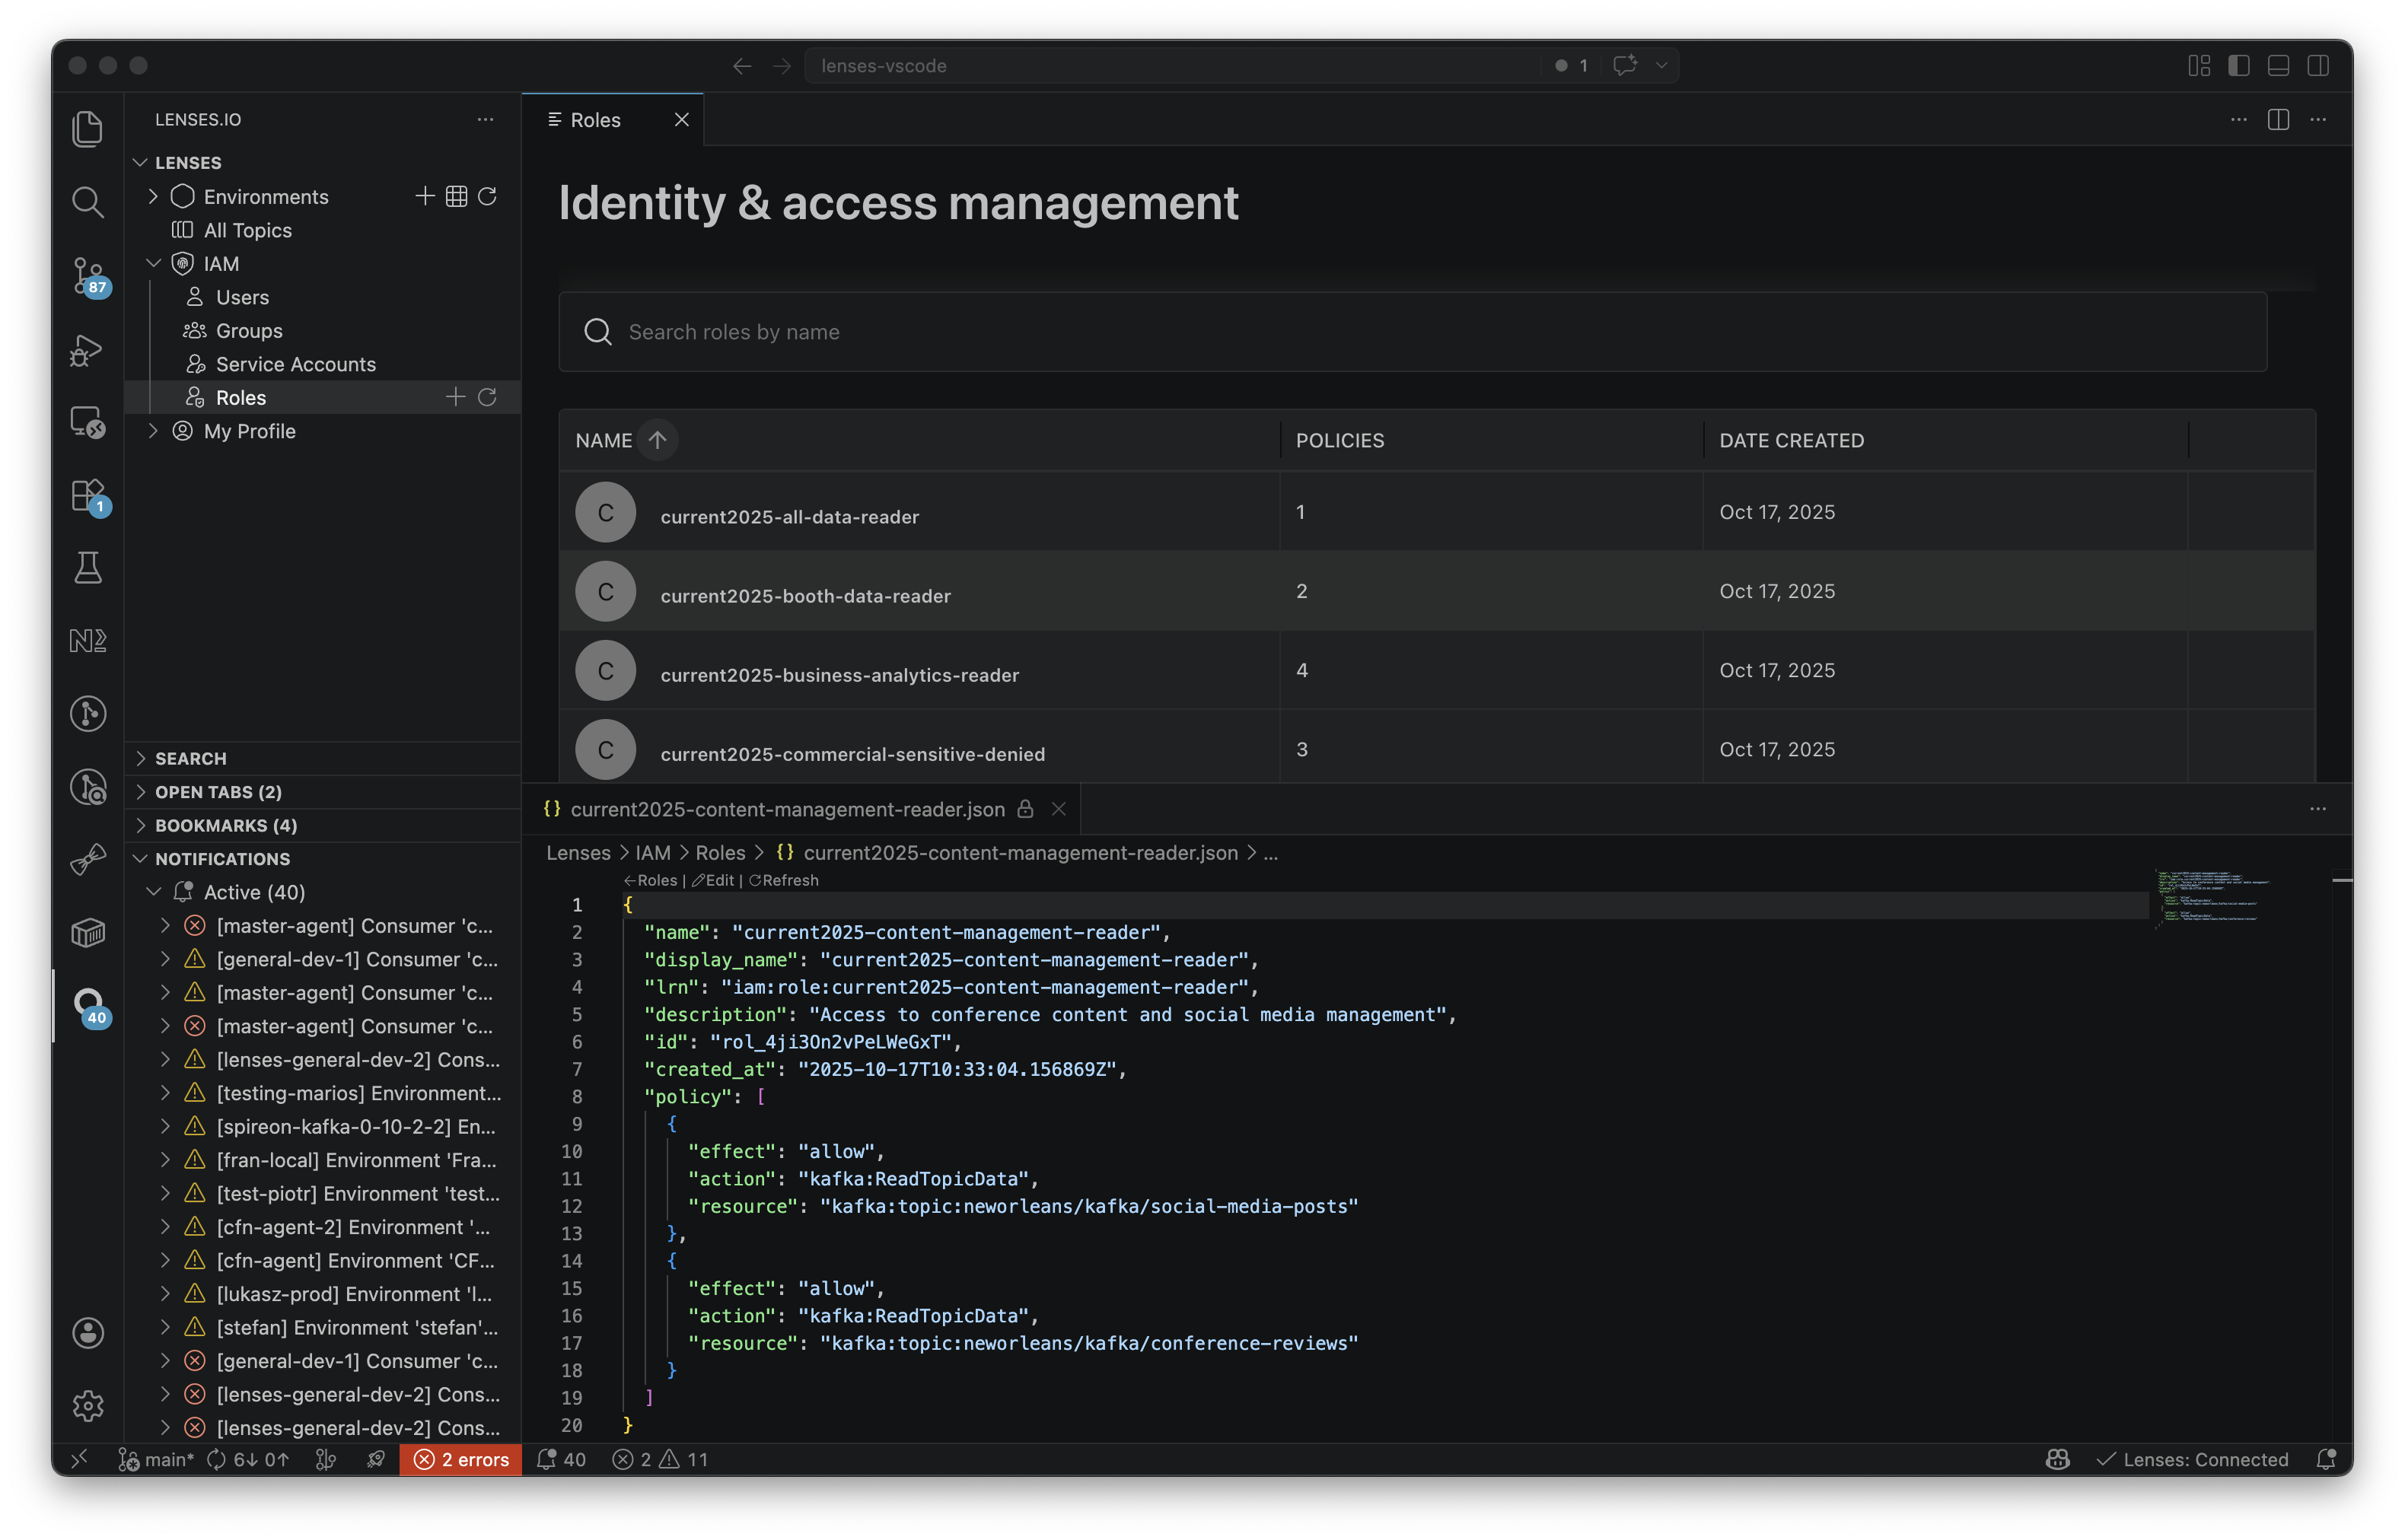
#### Manage IAM entities
Manage identity and access directly from VS Code.
* **Users**—Create, view, and delete user accounts for your Lenses instance
* **Groups**—Organize users into groups and assign roles to control what each group can access
* **Roles**—Define fine-grained permissions that specify exactly which actions are allowed on which resources
* **Service Accounts**—Manage credentials for API and programmatic access
All IAM entities open in a JSON editor with full schema validation, so you get instant feedback if something is misconfigured. Role names and permissions autocomplete as you type, and changes you make are reflected in real time across any open tabs.
### Comparison and monitoring
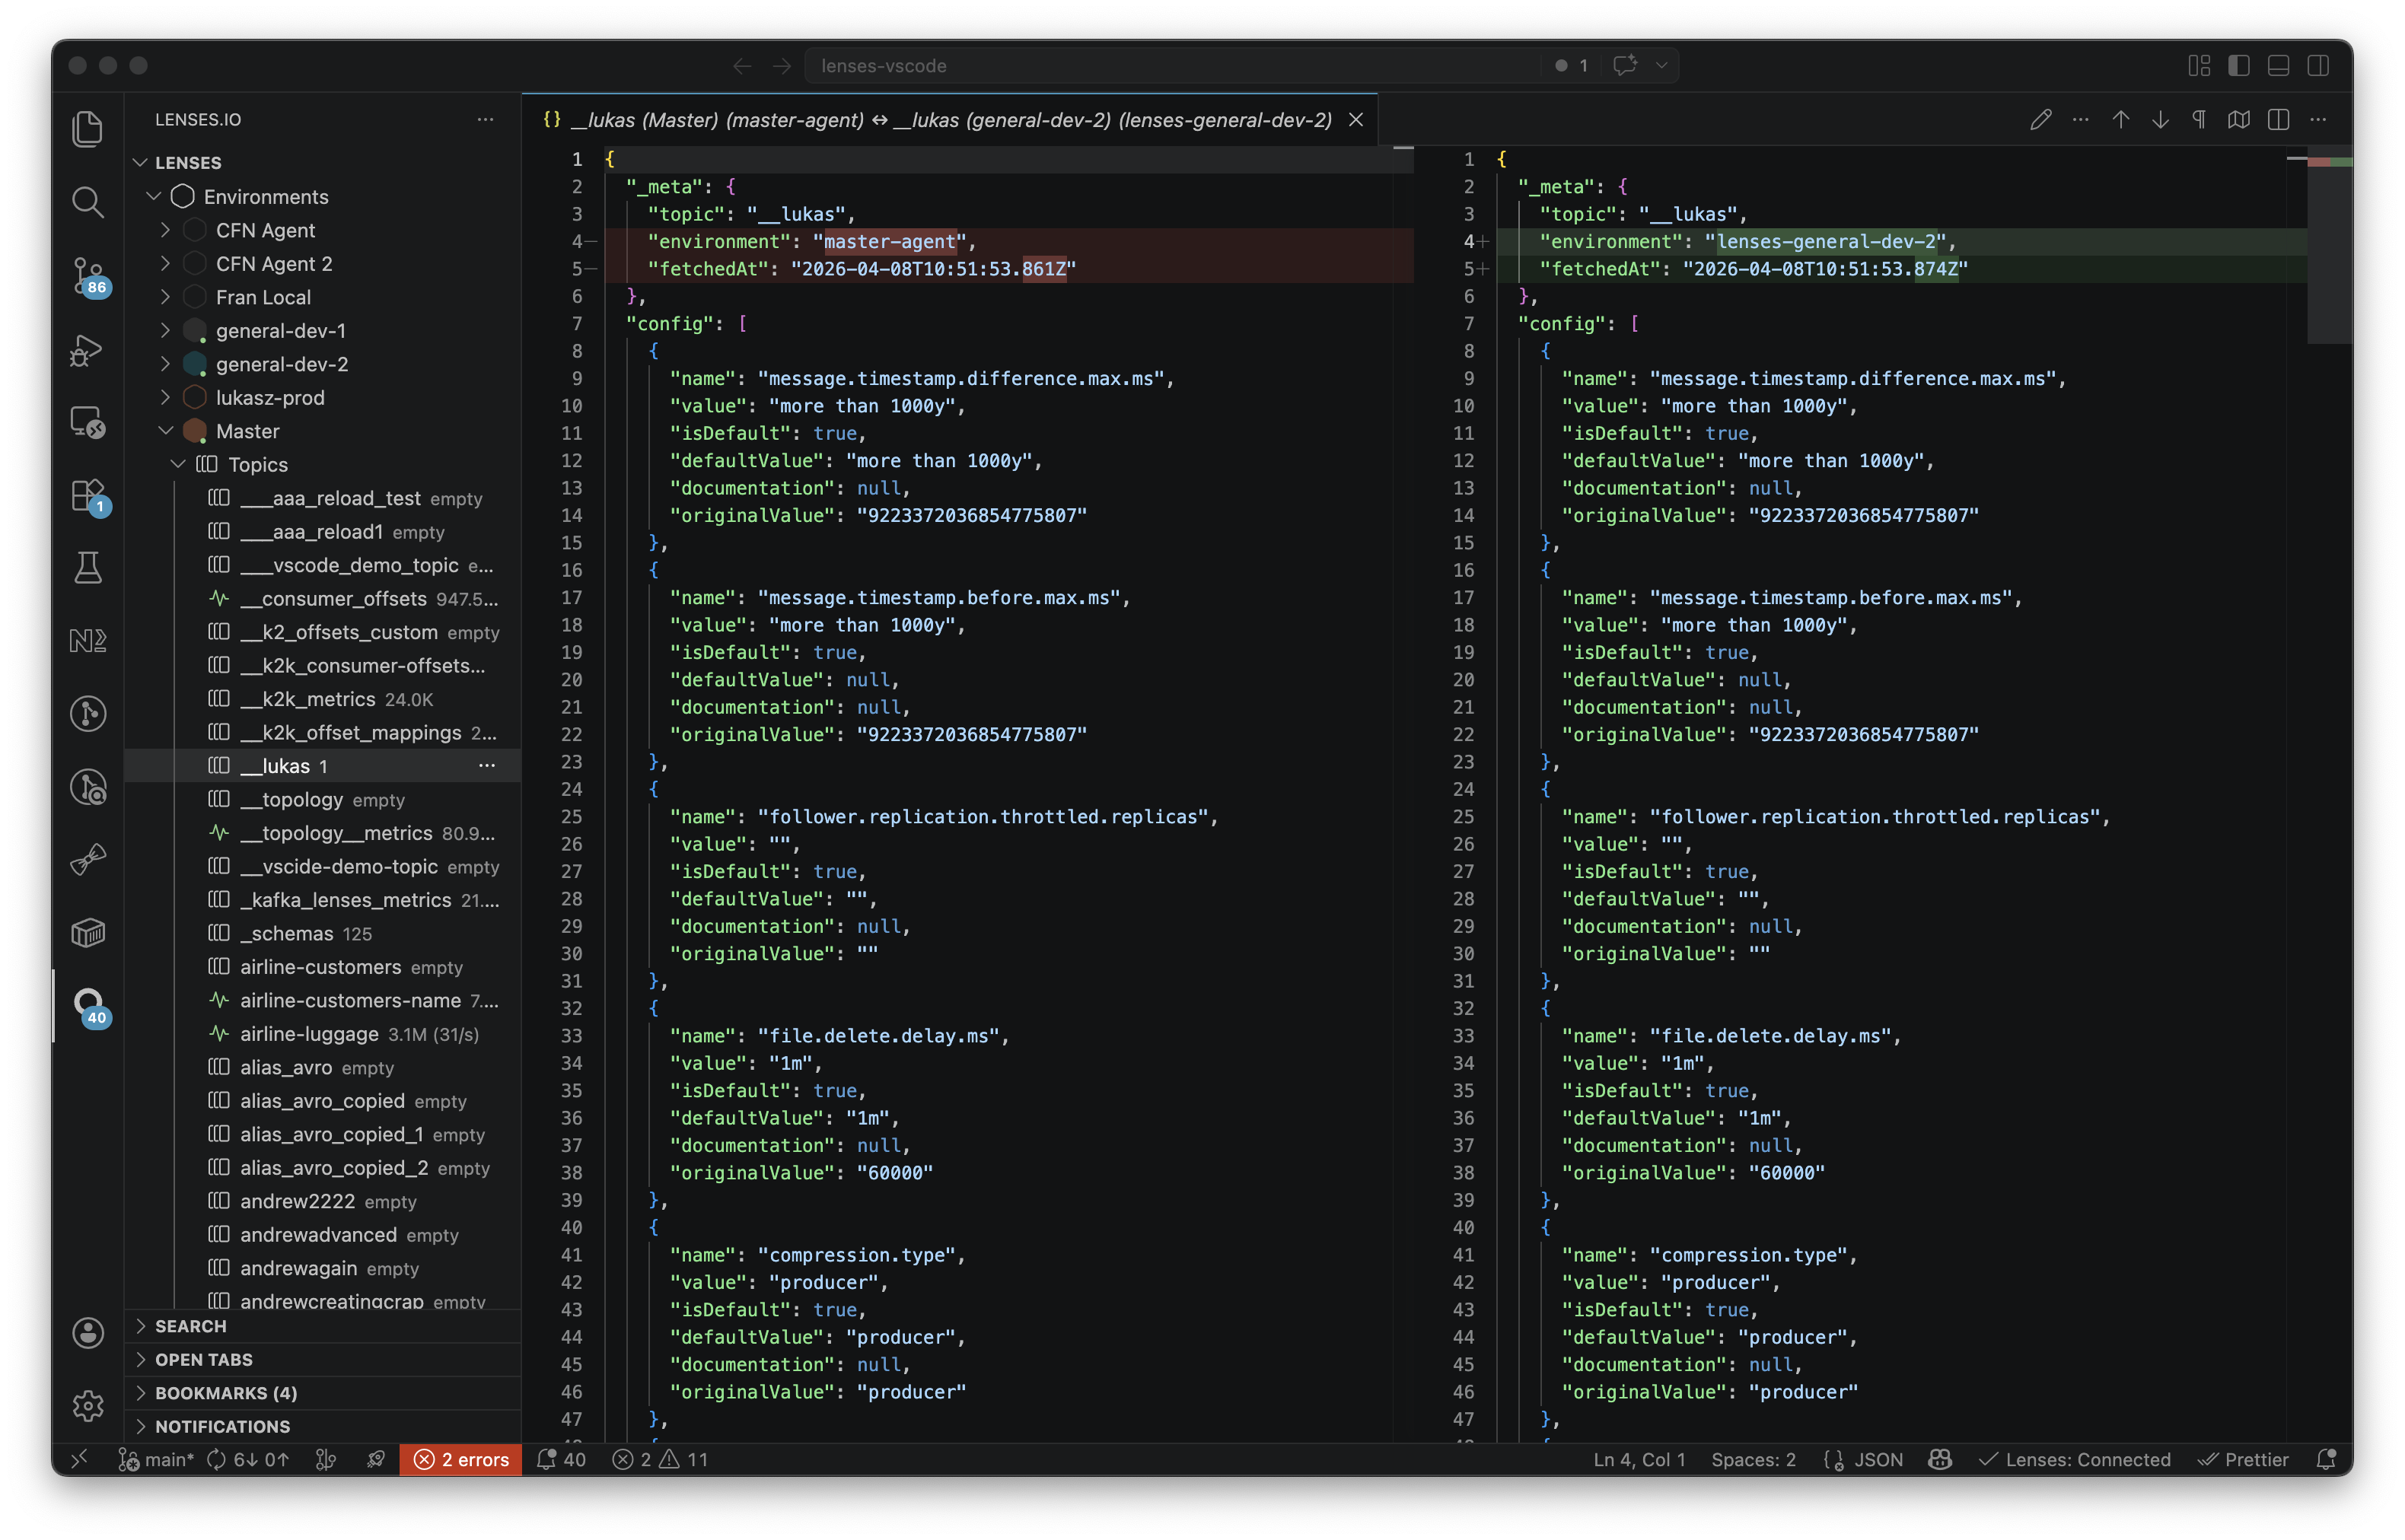
#### Compare configuration
Compare entities across environments using VS Code's native diff editor.
You can compare topic configurations and schemas (both key and value) across different environments to spot differences between staging and production. For global entities like groups and roles, compare any two side by side regardless of environment.
Start a comparison from the Command Palette or by right-clicking an entity in the tree view.
#### Monitor health
Monitor Kafka infrastructure health in VS Code's Problems panel.
* Warns you when consumer lag crosses your configured thresholds, so you can catch slow consumers early
* Alerts you when a connector fails or enters an unhealthy state
* Flags environment connectivity issues if an agent goes offline
* Optionally shows real-time toast notifications for critical issues so you don't miss anything while coding
### Productivity
#### Use bookmarks and saved queries
Keep your frequently accessed topics and queries at your fingertips.
**Topic Favourites:** Right-click any topic and choose **Add to Favourites** to pin it for access. Clicking a favourited topic opens a pre-configured SQL query, and you can remove favourites with one click when you no longer need them.
**Saved Queries:** Save any SQL query you want to reuse by pressing `Cmd+Shift+P` → **Lenses: Save Query**, or click the star icon in the SQL editor. Your saved queries appear in the sidebar so you can open them in a new tab with one click, and rename or delete them from the context menu.
All favourites and saved queries sync with your Lenses.io web app, so your workflow carries over seamlessly between platforms.
#### Search globally
Find any entity instantly with fuzzy search (requires initial indexing; very large environments may take longer to index). You can adjust search behavior, result limits, and other indexing options in the extension's settings.
Press `Cmd+Shift+L` (`Ctrl+Shift+L` on Windows/Linux) to open the search panel, then start typing. Results span all your environments, topics, users, and other entities, ranked by relevance. Click any result to navigate directly to that entity in the tree or open its document.
### Kafka connectors
Full Kafka Connect connector management directly from VS Code.
* **Dual tree navigation:** Access connectors under each environment (Environments > {env} > Connectors) and through the top-level "Apps" group (Apps > Kafka Connectors). The group filters environments with active Connect clusters and groups connectors by cluster.
* **View & edit:** View connector details as JSON. Edit configuration as YAML using the declarative ConnectorsAsCode API. Status-aware icons (green=running, yellow=paused, red=failed) provide status at a glance.
* **Create connectors:** Use YAML-based creation with JSON Schema validation for required fields and connector-class-specific schemas fetched from the API. This matches the hq-ui creation experience.
* **Full lifecycle:** Start, stop, pause, resume, restart, and delete connectors with confirmation dialogs. These actions are available from tree context menus, CodeLens, listing panel bulk actions, and Copilot/chat agents.
* **Listing panel:** Use the webview panel for table view, status filtering, and bulk lifecycle actions.
* **Task management:** Restart individual connector tasks from the tree view.
* **Cross-environment diff:** Compare connector configurations between environments using VS Code's native diff editor.
* **Health monitoring:** Failed and paused connectors surface in VS Code's **Problems** panel automatically.
---
# Agent Instructions
This documentation is published with GitBook. GitBook is the documentation platform designed so that both humans and AI agents can read, navigate, and reason over technical content effectively. Learn more at gitbook.com.
## Querying This Documentation
If you need additional information that is not directly available in this page, you can query the documentation by asking a question.
Perform an HTTP GET request on the following URL with the `ask` and `goal` query parameters:
```
GET https://docs.lenses.io/latest/vs-code-extension/features.md?ask=&goal=
```
`ask` is the immediate question: it should be specific, self-contained, and written in natural language.
`goal` is what the user is ultimately trying to achieve, the reason they need the answer. Sharing it helps GitBook give you a better, more relevant answer. A goal is most helpful when it describes the outcome the user wants rather than restating the question. For example, with `ask=how do I create an API token`, a goal like `automate deployments from our CI pipeline` lets GitBook tailor the answer to that use case.
The response will contain a direct answer to the question and relevant excerpts and sources from the documentation.
Use this mechanism when the answer is not explicitly present in the current page, you need clarification or additional context, or you want to retrieve related documentation sections.